So you’ve decided to build a Single Page App with React, and everything seems to be going dandy. You’ve got yourself some wireframes, a HTML file and a few components, and then you decide to add some routes. Easy, right?
Well, thats what you thought until you started reading the internet. But now you’re worrying about isomorphism and the HTML 5 history API and even how to pass props to your view components again. And if you thought learning all this was painful, imagine rewriting your application when the routing library’s API breaks in a few weeks.
Routing doesn’t have to be complicated, so why stress yourself out with libraries when a hand-rolled router can take less than 20 lines? Especially seeing that if you’d have just kept following this guide, you would have had something working in only two minutes…
Hash-based routing in two minutes
Routing means doing something in response to a change in the browser’s current URL. There are two ways you can accomplish this:
- pushState routing, using the HTML5 History API
-
hash-based routing, using the portion of the page’s URL starting with
#, i.e. the hash.
Hash-based routing is by far the simpler of the two alternatives, and with the exception of a few specific cases, it’ll usually do the job. So let’s go with this.
Implementing hash-based routing with React is simple; just choose what to render based on the string stored in window.location.hash. We’ll do this once on page load, and again each time the browser emits the hashchange event:
// Handle the initial route
navigated()

// Handle browser navigation events
window.addEventListener('hashchange', navigated, false);
Given the above two lines, all we need to do to finish our router is implement the navigated function. And since you won’t learn anything without putting it into practice, let’s do this as an exercise.
Exercise 1: Create a hash-based router
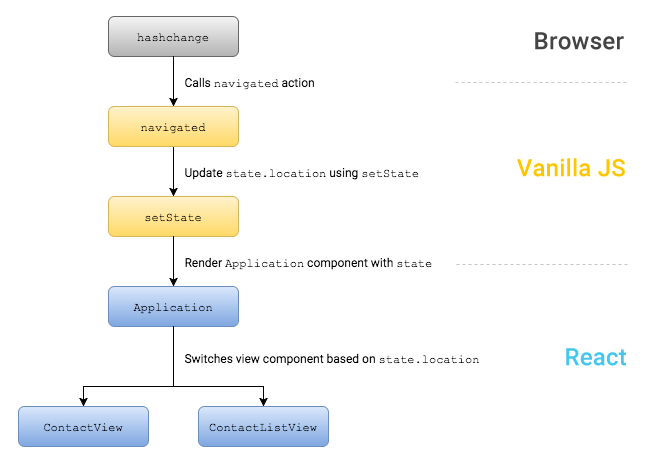
The specification for navigated is simple; it calls ReactDOM.render, with the passed in component depending on the value of window.location.hash.
Your task is to implement the navigated function, handling the following hashes:
- For
#/, use a component containing the textI'm amazing! I've made a Raw React Router! - Otherwise, use a component containing the text
Not Found
If you need a HTML file to test your script with, use the file from part 1‘s Exercise 1.
Once you have tested your work by entering in various URLs, compare your solution to mine by touching or hovering your mouse over this box:
function navigated() {
  // Choose which component to render based on browser URL
  var component = window.location.hash == "#/"
    ? React.createElement('div', {}, "Index Page")
    : React.createElement('div', {}, "Not Found")

  // Render the new component to the page's #react-app element
  ReactDOM.render(
    component,
    document.getElementById('react-app')
  );
}
Congratulations, you now know how to build a working router! Given enough time, you could use what you’ve learned to build a full-featured routing system.
Of course, while this incredibly basic router works, trying to integrate it with our contact list app from parts one and two is not going to scale. So let’s learn how to apply these fundamentals to a real app.
This is part three of my series on Raw React. If you’re new to React.js, start from part one. Otherwise, you can get your bearings at part two’s GitHub repository.
Managing the current location
In the example above, we’ve directly referenced window.location.hash when choosing what to render:
var component = window.location.hash == "#/"
    ? React.createElement('div', {}, "Index Page")
    : React.createElement('div', {}, "Not Found")
As we learned in part one, React apps don’t re-render themselves. Because of this, when window.location.hash changes value, we need to manually call ReactDOM.render to update the DOM. We had no trouble doing this in the first exercise, but how would we go about applying this to our contact list application?
Review: The Story So Far
In our contact list application from parts one and two, ReactDOM.render is never called manually. Instead, it is called from within our setState function. But what does the setState function have to do with rendering?
The setState function – as you may expect – is used to update the current application state. This state is stored in a global state variable – but crucially – we make sure to never update this variable directly. And because all updates to state happen through the setState function, we also know that the only time the app must be re-rendered is within each call to setState. That is – as long as the application’s state is completely stored in state.
One more thing. As setState is a global, we could call it from anywhere. But we’ve decided to only call setState from functions which directly handle user input. We call these functions actions, and place them all in a single location within the source code, passing them via props to where they are required.
Location as state
But now that we’ve remembered how our app fits together, it seems we have a problem: our simple hash-based router requires that we call ReactDOM.render manually, but our app requires that ReactDOM.render is called from within setState.
Can you think of a way to reconcile this? Have a think about it, then check your intuition by touching or hovering your mouse over this box:
window.location.hash each time we render, we can instead store it inside our state object by calling setState within the hash change handler. In other words, we can turn our navigated function into an action.
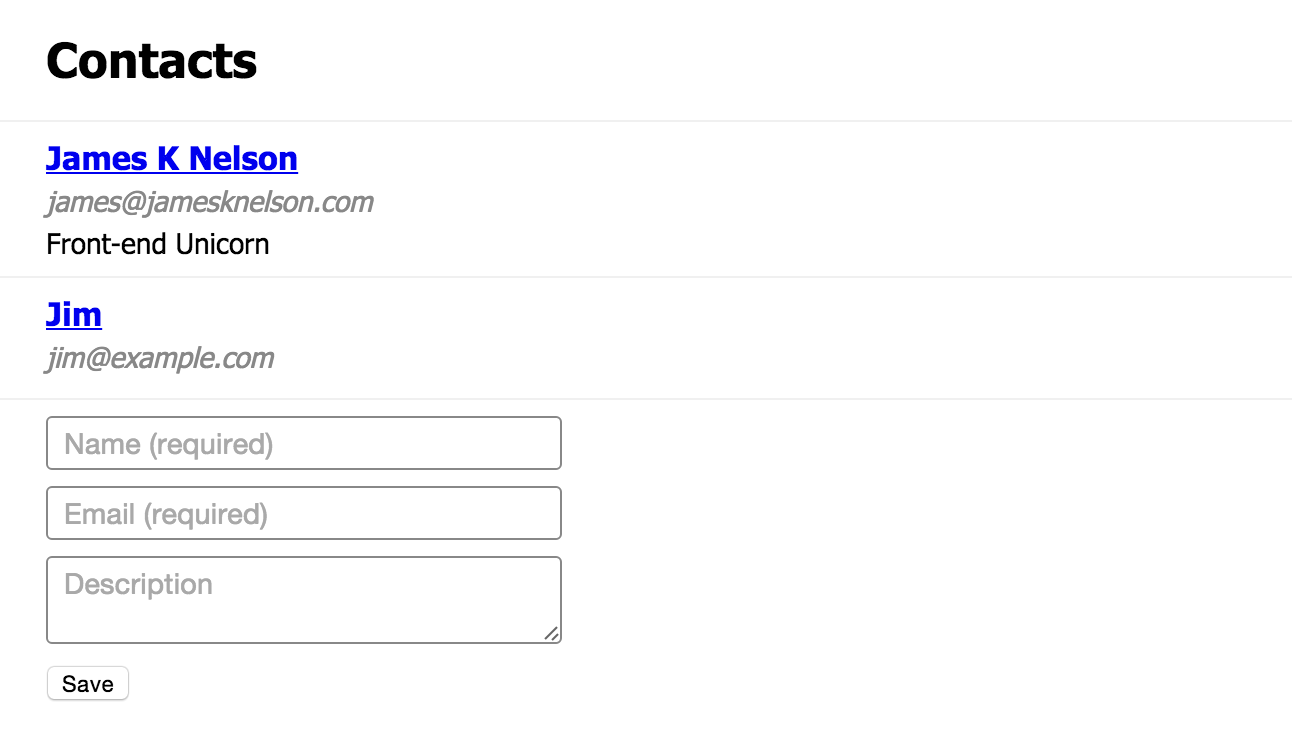
Exercise 2: Adding routing to your contact list
Lets continue from where we left off in part 2, and give our contact list app some routes! To start, we’ll keep it simple by providing only two routes:
-
#/contacts, which displays the existing contact list - a default route, which displays a “Not Found” message and a link to
#/contacts
Your task is to implement the following changes:
- Add a
navigatedfunction which stores the current hash instate.location - Call
navigatedon page load, and on subsequent hash change events - Modify
setStateto render the correct content for the current value ofstate.location
Once you’ve got it working (or gotten stuck), compare your answer with mine:
Of course, a single page app shouldn’t literally be a single page. So let’s add an edit form!
Extracting route parameters
We’d like to be able to specify the contact we want to edit by adding its id to the hash, following this pattern:
#/contacts/<id>/
The <id> part of the above hash is called a route parameter. Note how the parameter is delineated by / characters; you might be familiar with this if you’re used a server side tool like Express or Ruby on Rails.
Actually, it isn’t just route parameters that we delineate with / – our route names are also sandwiched between slashes. Given this is the case, lets make our job easier by storing an array of parts in state.location, as opposed to the hash itself:
['contacts', '<id>']
Did you notice how I didn’t write ['#', 'contacts', '<id>'] or ['', 'contacts', '<id>', '']? While these are perfectly valid ways of storing your current route, the information we care about is all located between the first and final / characters. So let’s cut the crusts off:
// Removes the `#`, and any leading/final `/` characters
window.location.hash.replace(/^#\/?|\/$/g, '').split('/');
But James, you ask – won’t routing based on URLs get me into trouble in the long term? If my URL structure changes, refactoring it will be a nightmare! Actually, you’re spot on.
URL parsing tools
While this article is about the fundamentals of routing with React, for any real project you’ll probably want to use a tool to name your routes and route parameters, and to lookup/generate URIs using these names.
The tool I use for this purpose is called uniloc, and is part of Unicorn Standard – my collection of tools for JavaScript-based Single Page Applications. And on the odd chance you’d like to learn how to build a real react app, you can get a version of the contact list project extended to use uniloc just by signing up to hear about my latest articles and tools! But I digress.
Get the uniloc/Raw React example project
Exercise 3: Selecting component props by hash
Now that you know how to extract the route parameters, lets actually set up a (read-only) contact form. Heres the view component we’ll use:
var ContactView = React.createClass({
  propTypes: {
    contacts: React.PropTypes.array.isRequired,
    id: React.PropTypes.string.isRequired,
  },

  render: function() {
    var key = this.props.id;
    var contactForm = this.props.contacts.filter(function(contact) { return contact.key == key })[0];

    return (
      !contactForm
        ? React.createElement('h1', {}, "Not Found")
        : React.createElement('div', {className: 'ContactView'},
            React.createElement('h1', {className: 'ContactView-title'}, "Edit Contact"),
            React.createElement(ContactForm, {
              value: contactForm,
              onChange: function(){},
              onSubmit: function(){},
            })
          )
    )
  },
});
props: while the contact objects from part two specify a key value and no id, this view’s props specify an id but no key. This is because key is a special prop which is consumed by React. See the React documentation for more details.
Your task is to display the ContactView under the /contacts/<id>/ route, and add links to this view to the contact list.
Once you’ve got this working, compare your answer with mine:
Your app is finally starting to take shape! You can add contacts, navigate between pages, and you can even use the browser forward/backward buttons (don’t laugh, a lot of web apps fall to pieces when the user touches them).
But while it’s great that you’ve managed to get this far, having a giant switch statement smack bang in the middle of setState obviously isn’t going to scale. So let’s fix this with an Application component.
The Application component
The Application component is the component we’ll pass to ReactDOM.render. It takes the state global as its props, and returns the rest of the application:
ReactDOM.render(
  React.createElement(Application, state),
  document.getElementById('react-app')
);
This seems pretty simple, but it’s actually a really big deal. Why?
One of React’s biggest strengths is that the stateless components typically used with it encourage you to design apps which are easy to reason about. By specifying your entire user interface’s state with a single state object, you cleanly separate your app into two parts:
- A model, which manages your application state
- A view, which defines how to render that state
Your Application component is the interface between model and view. Because of this, a well written Application component will at a glance show you how your entire app fits together.
Actions, Callbacks & Application
As part of wiring your application together, your Application component is also responsible for passing the correct actions to the views which it renders:
React.createElement(ContactsView, Object.assign({}, this.props, {
  onChangeContact: updateNewContact,
  onSubmitContact: submitNewContact,
}));
Object.assign? Read about it at Mozilla Developer Network.
But as our app currently stands, all actions are global functions. So why not just use these action functions directly from the view components?
When asking this question, it helps to remember the reason we’re using React in the first place – we want to be able to compose our application from reusable components. Using global actions within view components ties them to the specific application, while at the same time hiding the component’s dependencies from anyone trying to grok the app through its Application component.
Exercise 4: Implement your Application component
Implementing your Application component is simple: all you need to do is shift the functionality which is currently inside your setState function to a new Application component.
Also, since we’ll eventually want to handle user input in our edit form, let’s take this exercise as an opportunity to add empty updateContactForm and submitContactForm actions. These actions should be passed from Application into the ContactView component, which will in turn pass them to ContactForm.
Your task is to implement the Application component, with empty updateContactForm and submitContactForm handlers.
When you’ve finished, compare your implementation with mine. It should be nearly identical:
And with that simple change, your application’s guts are now all clean and tidy! But your users won’t care if the “Save” button doesn’t work. So let’s fix it.
Navigating programatically
Action functions like the one called by “Save” often need to send the user to a different page. But while <a href="#/..."> tags provide a simple way to let users navigate, they won’t help us when we want to change the location programatically. So what are we to do?
Our first thought might be to simply change our “Save” button to an <a> tag styled like a button. But this will not allow us to call an action function; the user will be able to navigate, but won’t be able to save the form’s contents. So instead, let’s mimic the functionality of <a> from within our action by using the window.location.replace function:
// Navigate to `#/contacts`
window.location.replace(
  window.location.pathname + window.location.search + '#/contacts'
);
Exercise 5: Navigate within an action
When the user clicks on the “Save” button before the form input has changed, the user will still expect to be taken back to the contacts list.
Your task is to implement the submitContactForm action such that it sends the user to the contact list.
When you’ve finished, compare your implementation with mine by touching or hovering over this box. It should be nearly identical:
function submitContactForm() {
  window.location.replace(
    window.location.pathname + window.location.search + '#/contacts'
  );
}
Wonderful, the user will no longer be confused when they press the save button and nothing happens! But, given the app immediately displays “Not Found” when it is loaded, there’s a good chance they’ll never even see the save button. Let’s do something about that.
Redirecting
Redirecting is just a fancy way of saying “sending the user to location A when they request location B”. And now that we know how to navigate programatically, implementing redirection is simple: just update window.location as we’re handling navigation events:
function navigated() {
  var normalizedHash = window.location.hash.replace(/^#\/?|\/$/g, '');

  if (normalizedHash == 'some-route') {
    window.location.replace(
      window.location.pathname + window.location.search + '#/another-route'
    );
  }
  else {
    setState({
      location: normalizedHash.split('/')
    });
  }
}
The only trick here is to make sure you don’t update setState until you’ve reached the final destination. This is because updating window.location will cause navigated to be called once the browser has updated its URL. If you update setState on each step you take, you’ll end up rendering each intermediate route. This will cause performance issues; more importantly though, it will look terrible.
Why redirects are necessary
Within a single page app (or the web in general), you generally want to ensure that what is visible in the address bar:

Corresponds to what is actually visible within the page:
James, you say – I already know that. I’ve just read through an entire article on routing for crying out loud – and besides – this still doesn’t explain why redirects are necessary. But the reason I brought it up is that sometimes you have a URL which corresponds to more than one page.
The textbook example of this is the root location, i.e. #/. Do you know why the content underneath #/ may vary? Have a quick think about it, then check your answer by touching or hovering your mouse over this box:
The root location is the first location a user will see when they open an app. However, what a user wants to see initially will depend on what they’ve seen before.
Is the user a logged-in customer? They’ll probably want to see their contacts. Are they someone completely new? We’ll want to show them the registration form.
In order to ensure that the app’s URL and content match, you’ll need to redirect the user from the root location to the hash which matches their desired view.
Exercise 6: Handle the root location
Now that you know why you need a root redirect and how to implement it, why not give it a shot?
And while you’re at it, since the app now navigates programatically in multiple places, refactor your code by replacing your existing call to window.location.replace with a new startNavigating(newLocation) action.
Your task is to implement a redirect from the root location to #/contacts, using your new startNavigating function.
Once you’ve finished, compare your implementation with mine by touching or hovering over this box. It should be nearly identical:
function submitContactForm() {
  startNavigating('/contacts');
}

function navigated() {
  // Strip leading and trailing '/'
  normalizedHash = window.location.hash.replace(/^#/?|/$/g, '');

  if (normalizedHash === '') {
    // Redirect for default route
    startNavigating('/contacts');
  }
  else {
    // Otherwise update our application state
    setState({location: normalizedHash.split('/')});
  }
}

function startNavigating(hash) {
  window.location.replace(
    window.location.pathname + window.location.search + '#' + hash
  );
}
Great work! At this point, there is only one thing left: making the edit form work. And, given you’ve completed part 2, you should already be capable of completing this yourself! But before you do, there is one more thing you should know about:
Transitioning between locations
If we were to draw a timeline of the transition between two routes, it would look something like this:
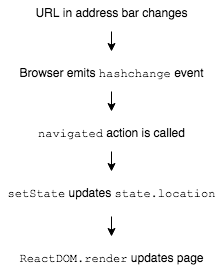
When the current location changes primarily because the user wants to see something else, this makes total sense. The user’s intent is to navigate, so the only property under state which needs to change is location.
But what happens when navigation happens for some other reason, like submitting changes to a contact? Let’s have a look! Assuming we implement our submitContactForm action with something like the following:
startNavigating('#/contacts');
setState({contacts: updateContacts});
Our flow will look like this:
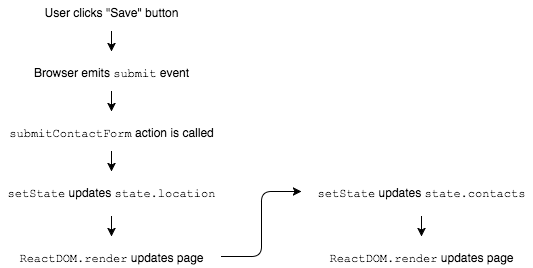
There is a problem here. Do you see it? Once you think you do, check your understanding by touching or hovering your mouse over this box:
ReactDOM.render first renders the new view component without the updated contacts, then re-renders it with the updated data. This slows things down, but more importantly will also result in old data briefly flashing on screen.To eliminate this problem, we can add a new transitioning property to our state object. When navigation starts, state.transitioning will be set to true, and when complete, it will change back to false. By ensuring setState only renders when state.transitioning is false, we eliminate the double render.
state.transitioning in our Application component’s render method instead, it would also be possible to apply CSS transitions between views.
Exercise 7: Complete implementation of the edit form
With the contact list app being almost complete, there is only one thing left to do:
Your task is to make the edit form work.
This will involve:
- Adding a new object to
statewhich stores the current values of the various contact’s edit forms - Updating your
ContactViewcomponent to show the edited data - Completing the
updateContactFormandsubmitContactFormactions
Be careful to make sure that the entered data is not saved until the user actually presses “Save”. Also, ensure that validation is performed correctly and any errors are displayed properly.
Finally, don’t forget to implement state.transitioning! While it may not feel necessary with an app of this size, ensuring that ReactDOM.render is not called multiple times will become increasingly important as your app starts to grow.
Once you’re happy with your implementation, compare it to this guide’s GitHub repository. Make sure your features match the specification, but don’t get too hung up on differences in implementation.
And there you have it, you now know the fundamentals of routing with React! Pat yourself on the back for a job well done!
Your next steps
Now that you know how to build a router, the next step is to go out and do it, right?
Hold on a minute. The next step actually depends on what you’re building. Are you creating a tiny app with only three or four routes? In that case, its time to get started! But what if you’re building something a little bigger?
In order to avoid 1000-line Application components it will become increasingly important to focus on how your routes are defined as your app starts to scale. And while nothing is stopping you from implementing this yourself, not everything is best solved with Raw React.
Don’t reinvent the wheel
The last thing I want anyone to take away from this guide is that tools are bad. Tools are incredibly important. But — if all you have is a hammer, everything looks like a nail. Without the knowledge of how a router works, all you really have is react-router et al.
Now don’t get me wrong – react-router is a great tool for a number of use cases. But now that you know how routing works, you should be able to pick the best tool for your use case. And on the odd chance that you decide this is a Raw React, hash-based router, you’ll probably want a tool to help map URLs to routes. And as it happens, I made uniloc just for this purpose. And to give you a head start, I’ve put together a small example project for my subscribers which marries uniloc with your contact list app.
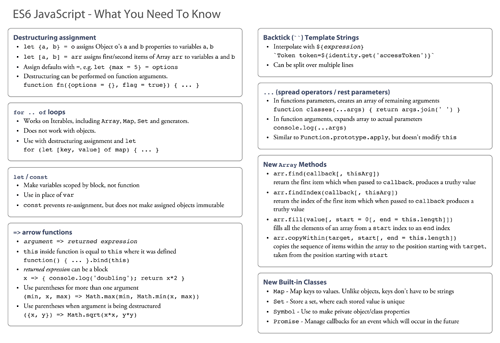
In return for your e-mail address, I’ll send you the next episodes in the series as they’re released. As a bonus you’ll also immediately receive the uniloc-enhanced project source, and 3 print-optimised PDF cheatsheets – on React, ES6 and JavaScript promises.
I will send you useful articles, cheatsheets and code.
One more thing – I love hearing from readers. If you have something to say, send @james_k_nelson a tweet, or send me an e-mail at james@jamesknelson.com. Thanks for reading!
Read More
- Learn Raw React Part 1
- Learn Raw React Part 2: Ridiculously Simple Forms
- Push-state vs hash-based routing
- Interacting with the DOM in React
contribute:
// with #/product/id
var normalizedHash = window.location
.hash.slice(2);
// reproduce product/id
window.location
.hash.slice(1);
// /product/id
the state:
window.location
.hash.slice(1).split('/')
// out: ["","product","id"]
window.location
.hash.slice(1).split('/').splice(1,2);
// out: ["product",'id']
the next issue: approach routing more “expressive”,
and use RegEXP `*, + ? /:`?
`/product/:id`
`/product/category/:id*`
`/product/:number(\\d+)`
`/product/?search`
test case:
  '/product/:id'.match(/^\/product\/([^\/]+?)\/?$/i)

  // out: path:'product',   catch:':id'
trying1:
route: ‘/product/:120’
path: /product/id
  RegEXP: /^\/product\/([^\\/]+?)(?:\/(?=$))?$/i

  Keys: 120,

  path:id=120
by the way.. nice post thanks., james.. : )
I’ve found the final implementation for submitContactForm extremely complex. One of the things I like the most in React applications is the explicitness and easiness to reason about the data flow, avoiding exactly the kind of complex algorithms that make you stop and run in your mind each step to be able to grasp what that local state is doing there. I’ll try to work on a simplification and create a PR! 🙂
Also, is it a good idea to access the state directly from the actions — and even worse, update it, like in https://github.com/jamesknelson/raw-react-part-3/blob/master/src/actions/contact.js#L35 –?