Farewell Twitter, at least for now.

According to Twitter’s data on me, I signed up sometime in 2010. And for the first 4 or 5 years, I barely posted at all. I never really understood Twitter. What interest could people find in 140 characters anyway?

When I started this blog though, I wanted to share what I’d created. Twitter was a way of doing that. I’d written about things that I thought might be helpful, and I had a Twitter account, so why not try tweeting about them? And surprisingly, it worked. Even though I had no followers, if I tagged something as #javascript or #reactjs, I’d get a few stars. It was a nice feeling.

Fast forward to 2020. I now have 6700 followers and change — partly because I helped people learn a new and useful tool, and partly because some people who won the fame lottery spread the word about this blog. It took a combination of luck and hard work. I’d say it was more luck than hard work, but as far as I can tell, that’s how life seems to go.

Here’s the thing though. At first, Twitter was a way of sharing what I’d created despite Twitter. It was a means to an end. But as time passes, Twitter becomes the end. It starts to fuck with your head.

Joseph Gordon-Levitt puts it better than I ever could in this amazing TED talk which you should watch three times and then watch again:

I’d be sitting there like, reading a script. And instead of thinking, k, how can I personally identify with this character, or, how is the audience going to relate to this story, I’m like, what are people gonna say about this movie on Twitter and what will I say back that will be good and snarky enough to get a lot of retweets but not too harsh because people love to get offended and I don’t want to get cancelled…

For me, the biggest effect that Twitter had was that I started to censor myself out of fear that bigger fish would stop retweeting me. I stopped calling out patterns that I didn’t think were helpful; important people liked those patterns. I stopped teaching people ideas I found helpful when I knew important people didn’t agree with them; I didn’t want to be called out and made to look like a fool. Sometimes, ignorance really is bliss.

There’s more though. Where once upon a time, I would have posted a quick-and-dirty blog post upon learning a new thing, I started tweeting instead. It was easier, and gave me more immediate validation — only to get lost in the ether within a day or two. I stopped posting content to this blog, and instead started working for Twitter for free, creating content that helps them to capture the attention of others… which they’d then sell to the highest bidder.

The follower count makes everybody feel terrible about themselves. That feeling of inadequacy is what drives you to post so you can get more attention and that attention that you get is what these companies sell.

Joseph Gordon-Levitt

But the worst part? I started to let the politics of Twitter get to me. Last year, I let attacks against a certain subset of the community rile me up, despite those attacks being 100% unrelated to technology. The outrage I felt caused me to lash out at people I care about in the real world, in large part because of my attachment to imaginary internet points.

I’ll say it again — Twitter fucks with your head.

I’ve been unhappy with Twitter for a while, but watching Joseph Gordon-Levitt’s TED talk made me realize that I’m not alone. Hell, if someone with over 4 million followers feels this way, there’s absolutely no hope for the rest of us.

But actually, there is hope. You see, the wonder of the internet (at least as of May 2020) is that anyone can publish anything. I don’t need a Twitter account to get my message out. The fact that you’re reading this shitty WordPress-based blog is proof of that. (Seriously though, I love you WordPress ❤️)

Sure, deactivating my Twitter account means that there are some people who won’t hear what I have to say. But the thing is, letting Twitter live in my head rent-free means it’s less likely that I’ll have anything worth saying in the first place. So farewell for now, Twitter.

One of these days, I hope to launch a social network that isn’t structured to encourage outrage. But until then, I’ll be writing here and at Frontend Armory, and you can always get in touch by sending me an email at james@jamesknelson.com.

See you round!

P.s. I just removed the social media share buttons from this website. So if you liked this post, instead of sharing it on social media, could you share it via message or email with the people who you know that you think would benefit from it? It’d make my day 🙂
Learn React’s fundamentals without the buzzwords

Companies everywhere are moving to React, and for good reason. It makes building real-world apps a breeze!

But React comes with a boatload of buzzwords. Redux and GraphQL and Webpack and JSX and how am I supposed to get anything done when keeping up with the ecosystem is a full time job in itself?

Forget the buzzwords

A few years ago, I’d grown tired of learning new tools every other week. I wanted to make something that’d last, so I created a short guide called Learn Raw React. It teaches you the fundamentals, and completely skips anything that could change – there’s no webpack, no redux, and even no JSX!

Now you might think that you can’t do much with just Raw React. But surprisingly, developers loved it! They found that focusing on Raw React revealed what’s really going on, and it helped them feel more confident with real world code to boot. Even one of Redux’s co-authors chimed in:

But while developers found themselves more confident after learning about elements and reconciliation, React was still in it’s infancy. Many patterns had yet to be discovered. And many APIs were still just sparks in the React team’s imagination.

Raw React is becoming more powerful… and more important.

Fast forward to 2018. React’s API is growing again. Planned features like Time Slicing and Suspense will let you do more with React itself. More people are replacing state management libraries with plain component state… including people within Facebook itself.

New React APIs mean less need for 3rd party tools. More than ever, your career depends on a deep understanding of React itself.

But despite the growing importance of the fundamentals, many still struggle with the same questions:

  • What’s the difference between elements, components and instances?
  • How does JSX actually work?
  • Why should I use key props with arrays?
  • When is it ok to use this.state?

I’ve seen how valuable Raw React can be as a tool to build confidence with the fundamentals. But there’s only so much you can put in a blog post…

Learn the fundamentals without leaving your browser

I believe that to truly master the fundamentals, you need actual experience working with them. I don’t want to waste your time on feel-good bullshit lessons that you just use to pacify your boss. I want to help you truly master React’s fundamentals. And that’s why I’ve put together a new learning platform for React and JavaScript, called Frontend Armory. It launches with a complete course on the fundamentals, called React (without the buzzwords).

This course is composed of 30 lessons, with 55 live examples and exercises. It lets you save your progress through lessons, and automatically saves your exercise answers so you can pick up where you left off. The course is designed to encourage you to learn by doing — the only way to truly learn something back to front. Curious how this works? Take a look a this lesson, which compiles and runs JSX for you as you type:

See what’s really going under all the JSX »

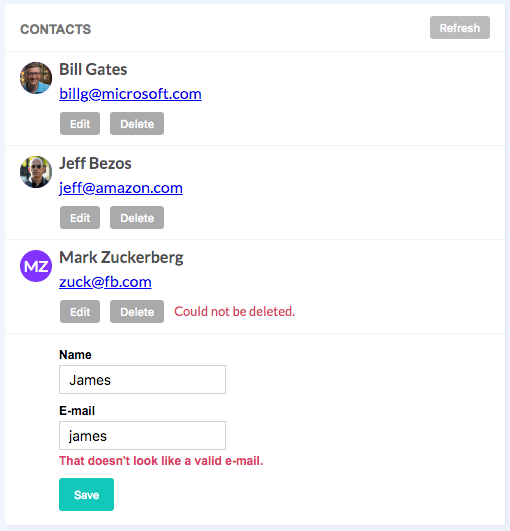
By working through the course, you’ll also gain experience with real-world code – you won’t be stuck building counter components. By the end of the course, you’ll have built a full contact list with form validation, asynchronous storage, and proper structure.


What you'll build in React (without the buzzwords)

Like a book, just better

React (without the buzzwords’) lessons are text and exercise based. There’s not a video in sight.

This has a number of benefits. It’s easier to re-read a paragraph than to rewind a video. It’s easier to skim ahead. And it’s easier to look back and forth between the text and the exercises. This is crucial, because the exercises are how you really learn the fundamentals.

It’s an investment

There are many patterns and APIs that you’ll need to understand to advance through your React career. Frontend Armory can help you learn these! But creating effective courses takes time. This course took months to create.

On the flip side, investments have returns. You will become a better React developer by learning the fundamentals. And you will be able to command a higher salary if you’re a React pro.

React (without the buzzwords) is exclusive to Frontend Armory Pro members. Of course, there’s more benefits to Frontend Armory Pro than just this course. And if they’re not worth far more than the price of the monthly membership, then please send me an e-mail and let me know why! But otherwise…

[bctt tweet=”New React APIs mean less need for 3rd party tools. More than ever, your career depends on a deep understanding of #reactjs itself.”]

Are you ready to invest in a solid foundation for your React career?

Learn React without the buzzwords

Start by trying out the 8 free lessons – just click the link below. There’s no signup required, you can get started immediately!

Learn how elements are just objects »

Want to know if the course matches your level? Not sure if the format suits you? Or maybe you just want to have a look first? Then try out the free lessons – you’ve got nothing to lose!

Or if you’re ready to get started? Great! You’ll get a special launch discount until the 31st of August. So head on over and join now before the launch sale ends:

Join Frontend Armory Pro »

Lastly, I just wanted to say thanks to you for reading this blog! I couldn’t keep going without the support of readers like yourself. So thank you! And stay tuned for more details on Frontend Armory coming soon 🙂

Got any questions about React, Frontend Armory, or JavaScript? I’d love to hear from you! Send me a tweet at @james_k_nelson!

I will send you useful articles, cheatsheets and code.

I won't send you useless inbox filler. No spam, ever.
Unsubscribe at any time.

Smash out React code with skills you learned years ago

The React ecosystem can feel a little overwhelming at times. The countless libraries to keep track of. The ever expanding toolchain. Even the language itself is changing! And the worst thing? The moment that you think you’ve got a grasp on it all, it slips away as a new version changes everything.

It would be so much easier if you could smash out productive code with skills you learned years ago.

Which brings me to a little secret…

React has barely changed in 2 years! In fact, Dan Abramov recently tweeted that the examples in React’s official tutorial used a 2 year old version of React.

Here’s the thing. React’s ecosystem moves fast, which is exactly why you need to focus on the fundamentals. Studying React itself will pay dividends for years.

Skills that last

Let me tell you a little story.

Way back in 2015, I started this blog because I wanted to teach people JavaScript. But I had a problem. Every time I wrote about a new tool or package, my article would be obsolete within months.

So I stopped writing about new stuff.

Instead, I decided to just teach React’s fundamentals. And the result? I started hearing from people how useful the articles were. My newsletter went from 600 to 6000 subscribers in under a year. I even got headhunted for my dream job.

And the best part? The articles I wrote 3 years ago are still useful today.

A new hope

Are you sick and tired of your tools changing underneath you?

Are you ready to put in the hard yards to learn React’s fundamentals, investing in a skill that lasts?

Then I have some good news for you!

exercise from new course

Later this week, I’ll be releasing a new interactive course on React’s fundamentals. It focuses on the essentials, only covering tools that have survived the test of time. And it’s full of exercises, ensuring that your new knowledge translates into experience.

I’ll be announcing it first to my newsletter with a big discount – if you haven’t joined already, then this is your last chance to become a member and get access to the early bird pricing!

I will send you useful articles, cheatsheets and code.

I won't send you useless inbox filler. No spam, ever.
Unsubscribe at any time.

See you soon!

CRUV: Structure React apps in 4 directories and 3 files

So you’re starting a React project. You know what you want to build, and quickly spin up a project with create-react-app. And then you’re confronted with the problem of where.

Where do your components go? Where should you put business logic? Where do higher order components fit in? And even if your structure feels right now, how do you know that it won’t feel wrong later?

If you’ve used other frameworks, you know that it doesn’t have to be this way. Rails gives you structure. So does Angular. What if React also had a system that told you exactly where files go? You could focus on building stuff instead of dicking around with folder structures.

In fact, there is a system that does just this. I’ve been using it for months now. It works great with create-react-app and any router you pick — even no router! And it’s named CRUV, after the 4 directories that you’ll use.

Containers, Routes, Utils, Views

CRUV is inspired by the directory structure from Ruby on Rails. It gives you four standard directories, for the things that you’ll definitely use. Then it lets you add other app-specific folders and subdirectories once you need them.

Creating a CRUV app is simple. All you do is generate an app with create-react-app, and then create 4 folders and 2 files. You can try it out by copying and pasting this into your terminal:

create-react-app myapp
cd myapp/src
mkdir containers routes utils views
touch config.js contexts.js 
mv App.* routes
sed -i '' -e 's/.\/App/.\/routes\/App/g' index.js

See the gist »

But what do the 4 directories and 2 files in this structure actually do? Let me demonstrate with examples from the app that runs my new Raw React course. Shameless plug: join my newsletter at the bottom of this page to keep in the loop when the course is released, and get a massive discount.

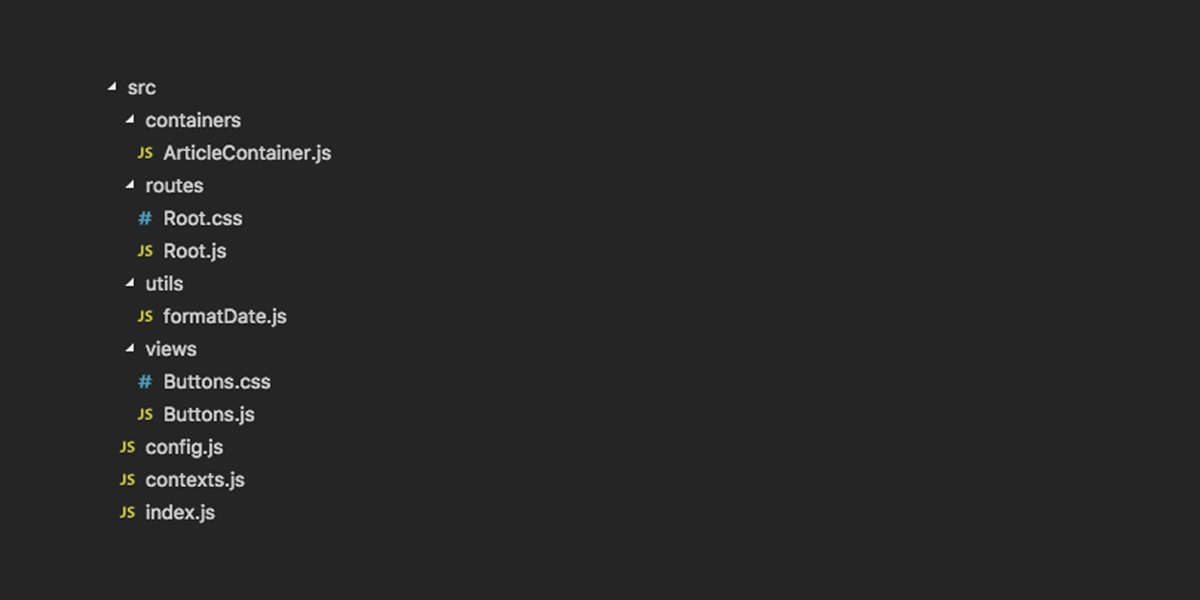
CRUV directory structure" width="150" height="150" class="alignnone size-thumbnail wp-image-1201"

/containers

This directory contains reusable container components. These components handle business logic, delegate style/markup to view components, and importantly, are used in more than one place.

Container components can also communicate with the server. In larger apps, they may delegate this to a Redux or Apollo store. But in smaller apps, they’ll usually just call the server directly.

Examples include:

  • An <ArticleContainer /> component that loads and wraps MDX documents.
  • A <CourseLessonContainer /> component that loads course access/progress from the server, and handles user requests to mark lessons as complete.
  • An <EditorContainer /> component that handles loading/saving of the students’s answers for exercises.

But what if you have something that looks like a container, but is only used once? Then it probably goes in /routes.

/routes

Routes are general purpose components that are only used once. They can handle both business logic and presentation internally, or they can delegate it to containers or presentation components.

Routes often correspond to individual URLs, and that’s where they get their name. But routes can also be independent of URL.

Examples include:

  • An <App /> component that wraps everything else, renders the app header, and decides what to render based on the current URL.
  • A <LandingPage /> component that contains your landing page’s content.
  • A <LoginPage /> component that shows a login form, and handles user input on that form.

So what router should your routes use? Whichever router you’d like, or even none at all! Because even if your app runs from a single URL, you’ll still need an <App> component. Maybe you’ll have other one-off components too.

/utils

This is the place to put files that get copied and pasted between many different projects. Things like vanilla JavaScript functions and classes, higher order components, and other utilities.

Some examples include:

  • A formatDate() function that converts JavaScript Date objects into strings.
  • A <Dimensions> component that uses a render prop to make the width and height of its children available.

/views

Put components that render markup and styles here, along with components that receive and display user input. Dan Abramov calls them presentational components. I call them “views”, because it’s faster to type within import statements..

Some examples:

  • Styled <Button> components.
  • A <CourseCard> component that creates a link to a given page, and looks like a “card”.
  • A <Grid> component that is used within route components and other views to handle layout.

I tend to start by creating one .js, .css and .test.js file per component, and putting them directly in the /views directory. So for example, /views/Button.css, /views/Button.js, and /views/Button.test.js. But this isn’t a hard and fast rule; you can also export multiple components from a single file. For example, an Indicators.js file may export both <Spinner /> and <LoadingBar />.

/config.js

Apps often have configuration that differs depending on the environment. For example, an API_KEY environment variable that differs between development, staging and production. While you can access this kind of configuration directly from process.env, I prefer to export it from a top-level config.js file. For example:

export default {
  server: process.env.REACT_APP_SERVER || 'http://localhost:3000',
  publicURL: process.env.PUBLIC_URL,
  stripeKey: process.env.REACT_APP_STRIPE_KEY,
}

/contexts.js

To use React’s Context API, you’ll frequently need to import <Context.Consumer /> components, which often don’t fit in any of the other categories. I like to keep these components in a single top-level file, making them easy to access, and also discouraging over-use of context. Here’s an example:

import * as React from 'react'

// Current route and methods for interacting with browser history
export const NavContext = React.createContext(undefined)

// Data received from server
export const StoreContext = React.createContext(undefined)

// UI context, including whether the subtree is disabled, is a form, etc.
export const UIContext = React.createContext(undefined)

/index.js

This is your application’s entry point, as created by create-react-app! Simple, huh?

As your project grows…

As your project grows, your views and routes folders can start to feel a little full. In this case, you might want to add subdirectories for each component, with an extra index.js file that re-exports the components. This let’s you keep the same filenames as before, without having to change any import statements.

For example, a /views/Button/index.js file might look like this:

export * from './Button.js'

You may also find yourself adding subdirectories that group related components. For example, I have a /views/editor subdirectory that groups together all the components involved in my course’s live editor.

Finally, in addition to the standard four CRUV directories, you may also find other useful directories. For example, my app has a /types directory, because it’s written in TypeScript. But I didn’t start with this directory. I only added it once my /utils directory got a little heavy with type definitions.

The reason that the CRUV structure works is that it’s just a starting point. When you’re just starting out, it gives you a simple structure to work with so that you can concentrate on writing actual code. And once your folders get full, all you need to do is find a few similar files, and move them into a new directory. It’s easier to categories files that already exist than to predict the future.

But where do my reducers go?

You may noticed that I haven’t added a directory for Redux reducers. And that brings me to this article by one of the creators of Redux: You Might Not Need Redux. Yes, you read that correctly: one of the creators of Redux is asking you to reconsider using Redux.

The reason that there are no /reducers or /actions directories in the CRUV structure is that Redux is optional. In fact, I write apps without Redux all the time!

But what if you do use Redux? Or MobX? Or Govern? In that case, my recommendation is that you add a /store directory, and put all your store related code in there. Stores hold global state that isn’t tied to a specific component, so they generally shouldn’t be very large.

And if you do have state that needs to be tied to a specific component? Use setState()! That’s what it is there for; component state is a simple, powerful, and underappreciated tool. Raw React can get you a long way.

Where is CRUV used?

If you’ve worked with some React apps before, CRUV may feel familiar. While the names are probably a little different, this pattern is something that often evolves by itself — especially when building on the Presentational and Container Components pattern.

In my case, CRUV is the structure that evolved from an app that I’m building to teach Raw React. I’ll be going into more details on how I built the platform behind the course soon. To get the details, or to be the first to hear about the Raw React course (and get a massive discount), join my newsletter below! I’ll even email you five free PDF cheatsheets to sweeten the deal.

I will send you useful articles, cheatsheets and code.

I won't send you useless inbox filler. No spam, ever.
Unsubscribe at any time.

One more thing – I love hearing your questions, offers and opinions. If you have something to say, leave a comment or send me an e-mail at james@jamesknelson.com. I’m looking forward to hearing from you!

Component-based state management for React

When I ask people what their favorite part of React is, one of the most frequent answers is “Components”.

And I agree. React’s component system is magnificent. It lets you split your code into small, single-purpose parts. It lets you work on one part of the app, while your colleagues focus on something else. It makes it simple to share useful parts with your team, and with a huge number of frontend developers all over the world.

But while React’s component system is great for creating view components, it can’t solve everything. And in particular, it can’t solve state.

Three types of state

React components are great at handling view state, like animations and transitions. And that’s no accident. After all, each React Component is tied at some level to the DOM, which is an abstraction for your application’s view.

But not all state is view state.

This is part of why Redux is so popular. It recognises that not all state is view state. It gives you somewhere to put what I call environment state, or information that must be accessible throughout your entire appliaction.

Examples of environment state include:

  • cached data
  • in-progress http requests
  • authentication

But even then, some state just doesn’t fit a Redux store.

This is because there is a third type of state, that isn’t global, and isn’t tied to the DOM. I call it control state.

As an example, consider a sign-up form component. You may want to re-use this component in multiple places. However, you may also want the state persist even when the component is not in the DOM. The state isn’t view state, and it isn’t environment state — it’s control state.

Examples of control state include:

  • form state
  • errors from POST requests
  • filters and sort orders
  • selected items

In today’s React apps, control state is often lifted up and treated as view state, or forced into a global Redux store. But while this kind of works, it feels like a missed opportunity. The thing is, React is all about components. And if you can create a <SignUpForm> view component, why can’t you create a store component too?

Store components

The thing about state management code is that it is often easily reusable. The problem is that React components are tied to the DOM, while control state is independent from the DOM.

So let’s take a step back for a moment, and imagine what a store component might look like if it wasn’t tied to the DOM.

To start, a store component would probably publish raw objects instead of rendering state, so it would have a publish() method in place of render(). It could still have state and props properties, and follow patterns we’re familiar with from React components.

Say we wanted to create a store component to represent the state of a single form field — perhaps it would look something like this:

class FieldModel extends Component {
  static defaultProps = {
    defaultValue: ''
  }

  constructor(props) {
    super(props)

    this.state = {
      value: props.defaultValue,
    }
  }

  // The only change is that control components publish objects instead of
  // rendering DOM nodes.
  publish() {
    let value = this.state.value
    let error = this.props.validate ? this.props.validate(value) : null

    return {
      value: this.state.value,
      error: error,
      change: this.change,
    }
  }

  change = (newValue) => {
    this.setState({
      value: newValue,
    })
  }
}

Actually, as you may have suspected, this component is real code. You can see it live on CodeSandbox. The only trick is that it isn’t a React component. It’s a Govern component.

Introducing Govern

Govern is a library for managing state with store components. These are a lot like React components – they can receive props, call setState, and define lifecycle methods. They can be defined as classes, or as stateless functions.

But importantly, store components publish raw JavaScript, so they’re not tied to the DOM.

Store components can be used to handle your app’s environment and control state, including actions, side effects and selectors. This means that Govern can replace redux (or MobX), redux-thunk, redux-saga, reselect, and even recompose.

But Govern works great with existing tools too. For example, this gist demonstrates a simple component that lets you interact with your existing Redux store from Govern.

And the best thing? If you know React, then you already know most of Govern’s API, so you’ll be productive in no time.

The best way to get started is to walk through my guide to React forms with Govern. Then, you can try it out live on CodeSandbox, or get more details from the API Reference.

And if you like what you see or find any issues, let me know with a star or an issue on the GitHub project!

One last thing – I’m using Govern in my own apps, so I’ll be keeping you up to date with my experiences over the coming months. If you haven’t already, make sure you stay in the loop by joining my newsletter. I’ll even throw in a few PDF cheatsheets when you do:

I will send you useful articles, cheatsheets and code.

I won't send you useless inbox filler. No spam, ever.
Unsubscribe at any time.

Thanks for reading, and until next time, happy Governing!

Sensible React Forms, with Govern

Creating forms with React can be a little tricky. Perhaps you decide to use Raw React, and end up repeating the same handler code each time you need a new field. Or maybe you force the non-global form state into a global Redux store. Either way, things get awkward quickly.

But luckily, React forms don’t have to be awkward. In fact, they can be downright easy. And the trick is simple: you just need to understand that form state isn’t like other state.

Three types of state

As it turns out, the problem is that web applications usually have three types of state, and we only talk about two of them.

1. View State

View state includes anything that is associated with the DOM itself. Examples include the state of animations and transitions.

React component state is great is a perfect way to store it, as each React component is tied to a DOM node.

2. Environment state

Environment state includes anything that is relevant throughout your entire application. Examples include the current user’s details, received data, or in-progress requests.

Redux is great at storing environment state, as you generally only have a single Redux store, which can be accessed anywhere via React context.

3. Control state

Control state includes anything associated with user interactions. Examples include the state of forms, selected items, and error messages.

The thing about control state is that it is associated with a specific part of the application, which may be loaded, disposed, or re-used in multiple places. This means that it isn’t environment state, and it doesn’t fit well in a global Redux store.

And while you can put form state in React components, it really doesn’t belong in them. After all, sometimes you want to keep your form state around after the DOM nodes disappear. Sure, you could lift your state up, except now you can’t easily re-use the logic. And isn’t React about reusable components?

But… what if you could define components that weren’t tied to the DOM?

Introducing Govern

Govern is a library for managing state with store components. These are a lot like React components – they can receive props, call setState, and define lifecycle methods. They can be defined as classes, or as stateless functions.

But instead of rendering elements, store components publish raw JavaScript, so they’re not tied to the DOM.

And the best thing? If you know React, then you already know most of Govern’s API, so you’ll be productive in no time. In fact, by the end of this short guide, you’ll be able to build a form with validation and connect it to a JSON API — and you’ll barely need to learn a thing!

So let’s get started by creating your first store component for managing form state.

Defining store components

Govern components are just JavaScript classes that extend Govern.Component. Like React components, they have props, state, and lifecycle methods.

For example, here’s how you’d create a Model component that handles state and validation for individual form fields:

import * as Govern from 'govern'

class Model extends Govern.Component {
  static defaultProps = {
    defaultValue: ''
  }

  constructor(props) {
    super(props)

    this.state = {
      value: props.defaultValue,
    }
  }

  publish() {
    let value = this.state.value
    let error = this.props.validate ? this.props.validate(value) : null

    return {
      value: this.state.value,
      error: error,
      change: this.change,
    }
  }

  change = (newValue) => {
    this.setState({
      value: newValue,
    })
  }
}

Govern components have one major difference from React components: instead of render(), they take a publish() method. This is where you specify the component’s output, which will be computed each time the component’s props or state change.

Subscribing to stores

Now that you have a Model component, the next step is to subscribe to its published values from inside of your React app.

Govern exports a <Subscribe to> React component to handle this for you. This component takes a Govern element for its to prop, and a render function for its children prop. It calls the render function with each new published value — just like React’s context API.

Here’s a barebones example that connects a <Model> to an input field, using <Subscribe>.

import * as React from 'react'
import * as ReactDOM from 'react-dom'
import { Subscribe } from 'react-govern'

ReactDOM.render(
  <Subscribe to={<Model validate={validateEmail} />}>
    {emailModel =>
      <label>
        Email: 
        <input
          value={emailModel.value}
          onChange={e => emailModel.change(e.target.value)}
        />
        {
          emailModel.error &&
          <p style={{color: 'red'}}>{emailModel.error}</p>
        }
      </label>
    }
  </Subscribe>,
  document.getElementById('root')
)

function validateEmail(value) {
  if (value.indexOf('@') === -1) {
    return "please enter a valid e-mail"
  }
}

Try it live at CodeSandbox »

Adding Govern to create-react-app

If you’d like to follow along and create your own app — which I’d highly recommend — then all you need to do is create a new app with create-react-app, and then add govern:

create-react-app govern-example
cd govern-example
npm install --save govern react-govern
npm run start

Once you’ve got Govern installed, you can just copy the above two code blocks into index.js, and you’re set! If you run into any trouble, take a look at the live example.


Did you get it to work? Then congratulations — you’ve just learned a new way to manage state! And all you need to remember is that:

  • Store components extend from Govern.Component in place of React.Component.
  • Store components use a publish method in place of render.
  • You can subscribe to store components with <Subscribe to>.

These three things will get you a long way. But I promised that you’d make a form component, and so far I’ve only demonstrated a field component…

Combining stores

Govern components have one special method that doesn’t exist on React components — subscribe().

When a component’s subscribe() method returns some Govern elements, the component will subscribe to those elements, placing their latest published values on the component’s subs instance property. You can then use the value of this.subs within the component’s publish() method, allowing you to combine store components.

For example, you could combine two <Model> elements to create a <RegistrationFormModel> component:

class RegistrationFormModel extends Govern.Component {
  static defaultProps = {
    defaultValue: { name: '', email: '' }
  }

  subscribe() {
    let defaultValue = this.props.defaultValue

    return {
      name: <Model defaultValue={defaultValue.name} validate={validateNotEmpty} />,
      email: <Model defaultValue={defaultValue.email} validate={validateEmail} />,
    }
  }

  publish() {
    return this.subs
  }
}

function validateNotEmpty(value) {
  if (!value) {
    return "please enter your name"
  }
}

Field view components

One of the benefits of using the same <Model> component for each field is that it makes creating reusable form views simpler. For example, you could create a <Field> React component to render your field models:

class Field extends React.Component {
  render() {
    return (
      <label style={{display: 'block'}}>
        <span>{this.props.label}</span>
        <input
          value={this.props.model.value}
          onChange={this.handleChange}
        />
        {
          this.props.model.error &&
          <p style={{color: 'red'}}>{this.props.model.error}</p>
        }
      </label>
    )
  }

  handleChange = (e) => {
    this.props.model.change(e.target.value)
  }
}

ReactDOM.render(
  <Subscribe to={<RegistrationFormModel />}>
    {model =>
      <div>
        <Field label='Name' model={model.name} />
        <Field label='E-mail' model={model.email} />
      </div>
    }
  </Subscribe>,
  document.getElementById('root')
)

Try it live at CodeSandbox ».

Stateless functional components

You’ll sometimes find yourself creating components that just subscribe() to a few elements, and then re-publish the outputs without any changes. Govern provides a shortcut for defining this type of component: just return the elements you want to subscribe to from a plain function — like React’s stateless functional components.

For example, you could convert the above <RegistrationFormModel> component to a stateless functional component:

const RegistrationFormModel = ({ defaultValue }) => ({
  name: <Model defaultValue={defaultValue.name} validate={validateNotEmpty} />,
  email: <Model defaultValue={defaultValue.email} validate={validateEmail} />
});

RegistrationFormModel.defaultProps = {
  defaultValue: { name: '', email: '' } 
}

Try it live at CodeSandbox ».

Calling a JSON API

Once you have some data in your form, submitting it is easy — you just publish a submit() handler along with the form data. Everything you know about handling HTTP requests in React components transfers over to Govern components.

However, Govern does give you an advantage over vanilla React — your requests can be components too!

For example, this component takes the request body as props, makes a request in the componentDidInstantiate() lifecycle method, and emits the request status via the publish() method.

Note: I use the axios package here to simplify the network code. If you’re following along, you can install it with npm install --save axios.

import * as axios from "axios";

class PostRegistrationRequest extends Govern.Component {
  state = {
    status: 'fetching',
  }

  publish() {
    return this.state
  }

  componentDidInstantiate() {
    axios.post('/user', this.props.data)
      .then(response => {
        if (!this.isDisposed) {
          this.setState({
            status: 'success',
            result: response.data,
          })
        }
      })
      .catch((error = {}) => {
        if (!this.isDisposed) {
          this.setState({
            status: 'error',
            message: error.message || "Unknown Error",
          })
        }
      });
  }

  componentWillBeDisposed() {
    this.isDisposed = true
  }
}

You can then make a request by subscribing to a new <PostRegistrationRequest> element.

class RegistrationFormController extends Govern.Component {
  state = {
    request: null
  };

  subscribe() {
    return {
      model: <RegistrationFormModel />,
      request: this.state.request
    };
  }

  publish() {
    return {
      ...this.subs,
      canSubmit: this.canSubmit(),
      submit: this.submit
    };
  }

  canSubmit() {
    return (
      !this.subs.model.email.error &&
      !this.subs.model.name.error &&
      (!this.subs.request || this.subs.request.status === "error")
    );
  }

  submit = e => {
    e.preventDefault();

    if (this.canSubmit()) {
      let data = {
        email: this.subs.model.email.value,
        name: this.subs.model.name.value
      };

      this.setState({
        request: (
          <PostRegistrationRequest data={data} key={new Date().getTime()} />
        )
      });
    }
  };
}

ReactDOM.render(
  <Subscribe to={<RegistrationFormController />}>
    {({ canSubmit, model, request, submit }) => (
      <form onSubmit={submit}>
        {request &&
          request.status === "error" && (
            <p style={{ color: "red" }}>{request.message}</p>
          )}
        <Field label="Name" model={model.name} />
        <Field label="E-mail" model={model.email} />
        <button type="submit" disabled={!canSubmit}>
          Register
        </button>
      </form>
    )}
  </Subscribe>,
  document.getElementById("root")
);

Try it live at CodeSandbox ».

Did you see how the key prop is used in the above example? Just like React, changing key will result in a new component instance being created, and thus a new request being made each time the user clicks “Register”.

While request components can take a little getting used to, they have the benefit of being able to publish multiple statuses over time — where promises can only publish one. For example, you could publish disconnected or unauthenticated states, along with a retry() action to give the request another crack.

Request components also make it easy to share communication logic within and between applications. For an example, I use a <Request> component within my own applications.

Performance note: selecting data

Govern’s <Subscribe> component needs to call its render prop each time that any part of its output changes. This is great for small components, but as the output gets larger and more complicated, the number of re-renders will also grow — and a perceivable delay can creep into user interactions.

Where possible, you should stick to <Subscribe>. But in the rare case that there is noticeable lag, you can use Govern’s <Store of> component to instantiate a Store object, which allows you to manually manage subscriptions.

Once you have a Store object, there are two ways you can use it:

  • You can access the latest output with its getValue() method.
  • You can return the store from a component’s subscribe() method, and then republish the individual parts that you want.

For example, here’s how the above example would look with a <Store of> component. Note that this adds a fair amount of complexity — try to stick to <Subscribe to> unless performance becomes an issue.

class MapDistinct extends Govern.Component {
  subscribe() {
    return this.props.from
  }
  shouldComponentUpdate(nextProps, nextState, nextSubs) {
    return nextProps.to(nextSubs) !== this.props.to(this.subs)
  }
  publish() {
    return this.props.to(this.subs)
  }
}

const Field = ({ model, label }) => (
  <Subscribe to={model}>
    {model => (
      <label style={{ display: "block" }}>
        <span>{label}</span>
        <input
          value={model.value}
          onChange={e => model.change(e.target.value)}
        />
        {model.error && <p style={{ color: "red" }}>{model.error}</p>}
      </label>
    )}
  </Subscribe>
);

ReactDOM.render(
  <Store of={<RegistrationFormController />}>
    {store => (
      <form onSubmit={store.getValue().submit}>
        <Subscribe
          to={<MapDistinct from={store} to={output => output.request} />}
        >
          {request =>
            request && request.status === "error" ? (
              <p style={{ color: "red" }}>{request.message}</p>
            ) : null
          }
        </Subscribe>
        <Field
          label="Name"
          model={<MapDistinct from={store} to={output => output.model.name} />}
        />
        <Field
          label="E-mail"
          model={<MapDistinct from={store} to={output => output.model.email} />}
        />
        <Subscribe
          to={<MapDistinct from={store} to={output => output.canSubmit} />}
        >
          {canSubmit => (
            <button type="submit" disabled={!canSubmit}>
              Register
            </button>
          )}
        </Subscribe>
      </form>
    )}
  </Store>,
  document.getElementById("root")
);

Try it live at CodeSandbox ».

Note how the above example uses getValue() to access the submit() action, but uses <Subscribe> elsewhere. This is because we know that submit won’t change, and thus we don’t need to subscribe to future values.

Also note how the selector component defines a shouldComponentUpdate() method. If this wasn’t defined, then each update to the from store would cause a new publish — even if the published value didn’t change! Defining shouldComponentUpdate() gives you control over exactly which changes cause a publish — just like with React.

Built-in components

Govern has a number of built-in elements to help you reduce boilerplate and accomplish common tasks. These are particularly useful for creating selector components.

The three built-ins that you’ll use most often are:

  1. <map from={Store | Element} to={output => mappedOutput} />

Maps the output of from, using the function passed to to. Each publish on the from store will result in a new publish.

  1. <flatMap from={Store | Element} to={output => mappedElement} />

Maps the output of from, using the output of whatever element is returned by to. Each published of the mapped element results in a new publish.

  1. <distinct by?={(x, y) => boolean} children>

Publishes the output of the child element, but only when it differs from the previous output. By default, outputs are compared using reference equality, but you can supply a custom comparison function via the by prop.


For example, you could use the <flatMap> and <distinct> built-ins to rewrite the <MapDistinct> component from the previous example as a stateless functional component.

const MapDistinct = props => (
  <distinct>
    <map from={props.from} to={props.to} />
  </distinct>
);

Try it live at CodeSandbox ».

What next?

Believe it or not, you’ve just learned enough about Govern to make useful applications with it. Congratulations!

In fact, I already use Govern in my own projects. I wouldn’t yet recommend it for critical applications, but with your help, it will continue to steadily involve.

If you do find any issues while using Govern, and find the time to file an issue, you’ll be my new best friend. I’m also extremely open to pull requests, and would be happy to help get the word out about any components you’d like to share.

Finally, if you like what you see, please let me know with a star on GitHub! And if you want to hear more about Govern, join my newsletter below – I’ll even throw in a few PDF cheatsheets as thanks!

I will send you useful articles, cheatsheets and code.

I won't send you useless inbox filler. No spam, ever.
Unsubscribe at any time.

Thanks for reading, and until next time, happy Governing!

My experience with React 16

If you haven’t already heard, the big news over the past fortnight is that React 16 was released.

Now I don’t want to waste your time with another “What is React 16?”; the official blog is already very informative. But what I can give you is the story of my experience this week, when I upgraded a large project to React 16.

The short version

If you have a React 15.5 app which doesn’t use deprecated features and doesn’t throw errors, then React 16 just works!

Of course, “it just works” doesn’t make for a very interesting story. So lucky for you, it didn’t just work for me.

Continue reading

JSX, HTML-in-JS and CSS-in-JS

Lately, I’ve been hearing a lot of people talk about JSX as if it is HTML-in-JS. So let me clear something up:

JSX is not HTML-in-JS.

The thing about JSX is that it is just a special syntax for writing plain-old JavaScript.

Each JSX element compiles to a call to a JavaScript function called React.createElement. In fact, you can write apps without using JSX at all; just call React.createElement by itself. Like this:

ReactDOM.render(
  React.createElement('div', {}, "Hello, world!"),
  document.getElementById('app')
)

To repeat myself, JSX is not HTML-in-JS. Yes, it is a way to specify the structure of the DOM. But so is raw JavaScript, like this:

const app = document.getElementById('app')
const hello = document.createElement('div')
hello.appendChild(document.createTextNode('Hello, world!'))
app.appendChild(hello)

If you’re writing an app with JavaScript, you need some way to modify the DOM. JSX is one way of doing it. Raw JavaScript is another. But in either case, you’re still working with JavaScript.

In contrast, HTML-in-JS would look a little like this:

const hello = "<div>Hello, world!</div>"
document.getElementById('app').innerHTML = hello

And sure, this is something you can do. Just like you could chug a bottle of Tabasco. A friend did that once. He was weird. But I digress.

Want to learn more about fundamentals like React.createElement? My Learn React By Itself series was made just for you!

CSS-in-JS

Another thing a lot of people are talking about lately is CSS-in-JS.

Unfortunately, CSS-in-JS is actually exactly what it sounds like. It is literally CSS in a JavaScript file. Let me repeat that. It is actually CSS in a JavaScript file.

The thing is, there are a number of very good reasons we generally put CSS in CSS files (or their LESS/SCSS cousins). For example:

  • Browsers expect to load CSS from CSS files.
  • Editors have syntax highlighting based on file extension.
  • Tooling such as minifiers and linters expect CSS.
  • Existing CSS libraries are written in CSS, LESS or SCSS.
  • CSS files can be cached separately from JS files.

Some CSS-in-JS tools do lots of very clever things to provide workarounds for all of these issues. But if you just use CSS or LESS or SCSS, you don’t need to provide workarounds. It just works.

Of course, there are supposedly a number of benefits. But most of these benefits can be had from more mature tooling like LESS, SCSS, CSS Modules and Webpack (which you’ll need anyway to, you know, put your CSS back into CSS files).

There are some benefits that are unique to CSS-in-JS:

  • You can add things like media queries directly to components, whilst you can’t with standard inline styles. (Yay?)
  • You can share JavaScript variables with stylesheets. Except that this is is massive security hazard.

But all the big names are using it, so it has to be good, right?

So here’s the thing: CSS isn’t perfect. It makes sense that smart people are building alternatives. And the tools do have some compelling use cases — they’ll work with react-native, for instance. But unless you 100% know what you’re getting into, and 100% understand the security implications, I’d wait a little bit longer before jumping on any bandwagons.

I’ve put a few more details on React Armory in my answer to Should I use CSS-in-JS?.

More good news

Keeping up with JavaScript and React can be exhausting — but it doesn’t have to be! The secret is that the basics never change. In fact, my most popular articles are ones I wrote years ago, and they’re still as relevant as ever.

JavaScript fatigue happens, but you can avoid it by sticking to the basics. And that’s why my fortnightly newsletter just focuses on the JavaScript and React fundamentals. So subscribe now — and get a bunch of free PDF cheatsheets as a bonus.

I will send you useful articles, cheatsheets and code.

I won't send you useless inbox filler. No spam, ever.
Unsubscribe at any time.

One more thing – I love hearing your questions, offers and opinions. If you have something to say, leave a comment or send me an e-mail at james@jamesknelson.com. I’m looking forward to hearing from you!

Read more at React Armory

Announcing React Armory

You may have noticed that the updates having been coming a little slower than usual lately. And now I can let you in on the reason!

I’ve been working on a new set of React guides, but with a catch: the code examples on React Armory are live! This means that you can learn React without leaving your browser. In fact, now you can learn React without even leaving your tab.

I’ll be steadily adding more guides over the coming months. But to start out with, I’ve put together a new version of my “Learn Raw React” guide, which starts with Introducing React.

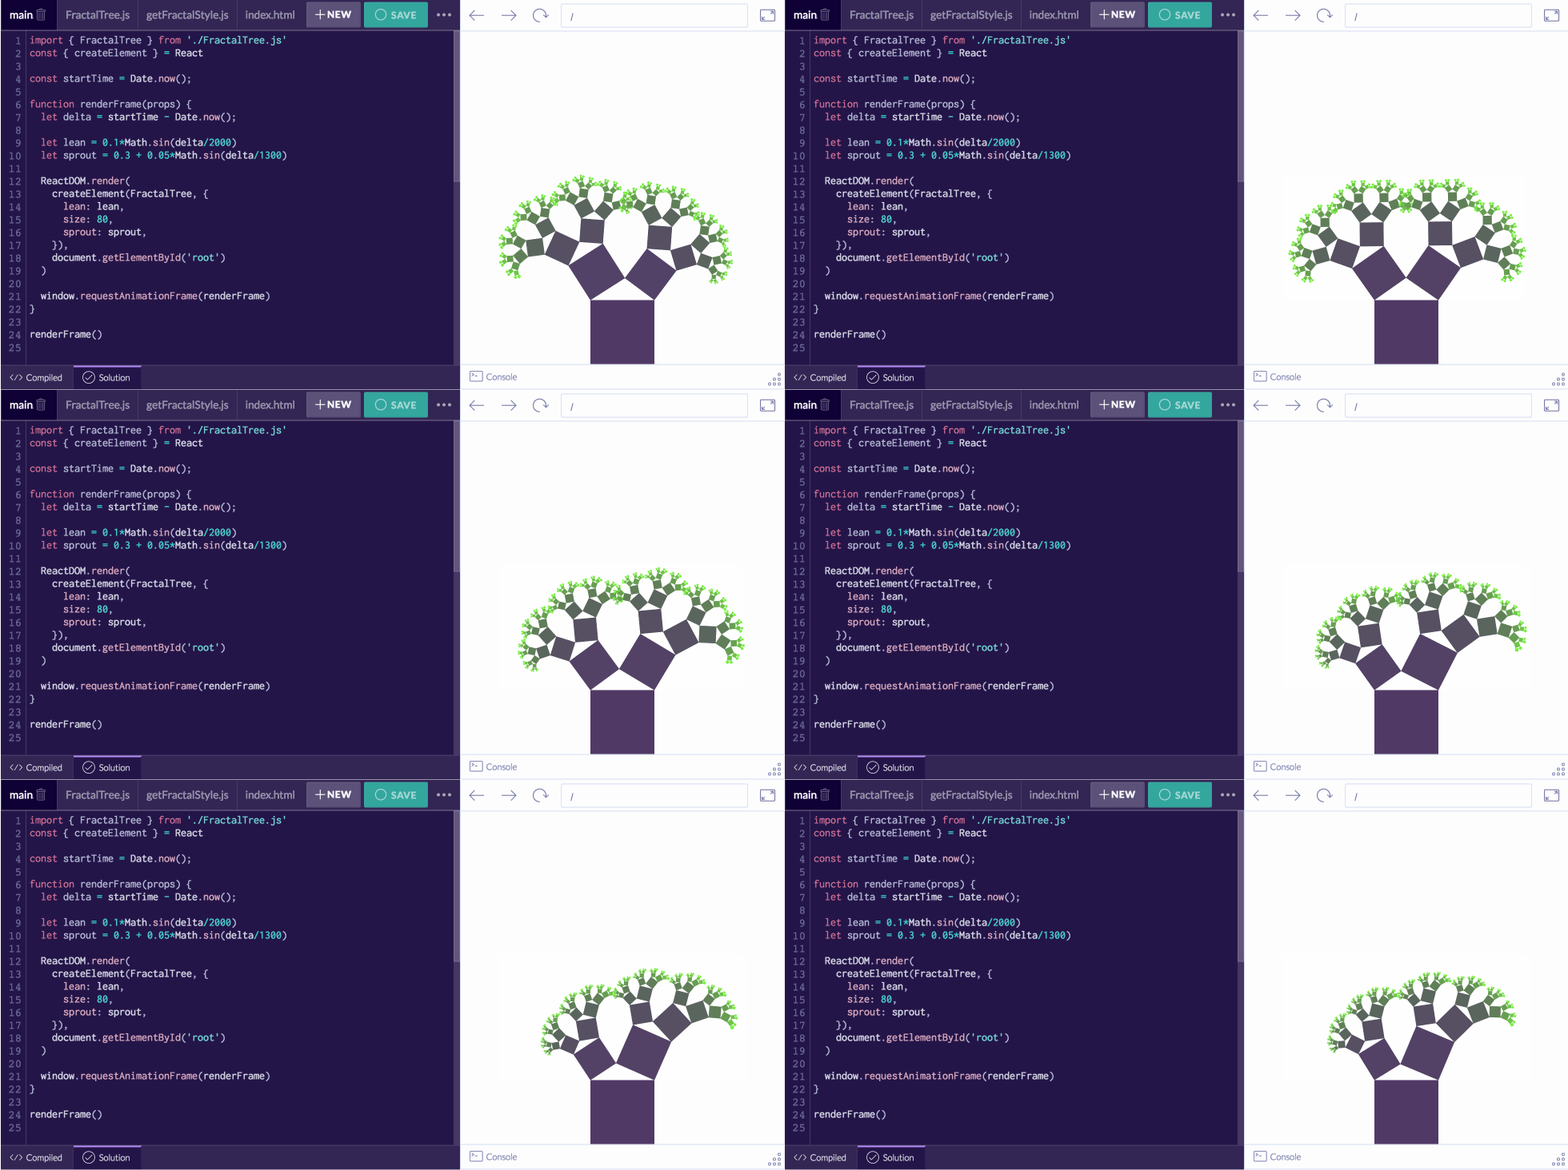
React Armory also includes a number of live examples, where you can test new ideas without configuring anything. For an example, you can play with this Animated Fractal Tree.

As always, I’d love to hear your feedback! Perhaps something in the new guides is unclear? Or maybe there is something you’d like to read about more? Whatever the reason, you’re always free to send me an e-mail at james@jamesknelson.com. I’m looking forward to hearing from you!

Introducing MDXC: A new way to write Markdown for React

Read the README and browse the source on GitHub, or mess around with the live demo.

Markdown is a fantastic tool. It makes writing simple. Markdown documents are plain text, so you don’t need to worry about tags and HTML and all that. You just write. And when you need a <a>, or a <h1>, it’s already there. It’s like magic!

But say you’re writing a React app with pushState, and you don’t want your links to use <a> tags; they break your smooth navigation. You want them to use react-router or react-junctions’ <Link> tags instead. And you’re shit outta luck, because you can’t. Or you couldn’t, before MDXC.

MDXC is a tool to make Markdown and React best buddies. Unlike traditional Markdown, MDXC produces actual JavaScript — not strings of HTML. MDXC lets you embed raw JSX within your Markdown, and even lets you import components and accept props. And to top it all off, MDXC lets you configure how each element is rendered, giving you all sorts of ways to confuse your users and also a few ways to genuinely improve their experience.

If you can’t tell yet, I’m pretty excited about MDXC. So please indulge me and take a gander at this example:

Continue reading