Update August 2018: A newer, more complete introduction to React’s fundamentals is available at my course “React (without the buzzwords)”. It uses the latest version of React, and covers many topics that “Learn Raw React” is missing, including component state, asynchronous data storage, JSX, structure best practices, and more.
“React (without the buzzwords)” is composed of 30 lessons, with 55 live examples and exercises. It lets you save your progress through lessons, and automatically saves your exercise answers so you can pick up where you left off.
React (without the buzzwords) is exclusive to Frontend Armory Pro members. But you can try these 8 free lessons just by clicking one of the links – no signup required:
Of course, the original “Learn Raw React” guide is still useful today! Here it is:
So – you’ve got the hang of React, and you’ve even built a little app. But after making your app look nice, you remember that you also need to make it work. And that’s when you start searching for form libraries.
First you look for tools to structure data and event flow. Then you shift focus to libraries which reduce repetition in form components. And while you’re at it, tools which validate user input would certainly help. Tools like react-forms and formsy-react and flux and redux and RxJS and as one redditor put it:
I’ve been evaluating a few frameworks out there. It’s been the bane of my existence for the past two weeks.
Wasn’t the whole idea that tools would save you time?
Why spend two weeks investigating when you could have implemented the most important part in three minutes? Its not even like you’d have to think that hard; all you have to do is follow this exercise:
Exercise 1 – Collecting user input
This is part two of my series on Raw React. If you’re new to React, start from part one. Otherwise, get the starter code from part one’s GitHub repository.
Before we move on to the exercise, let’s answer a quick revision question: If an element’s props can take string and array values, can they also take a function? Touch or hover your mouse over this box for the answer:
props are called callback functions.
Gathering keystrokes from an <input> element is accomplished by passing a callback function to its onChange prop, like so:
React.createElement("input", {
    // The callback passed to `onChange` will be called when `value` should change
    onChange: function(syntheticEvent) {
        // Log new `value` to JavaScript console
        console.log(syntheticEvent.target.value)
    }
})
But this exercise is titled collecting user input, not callback functions – so let’s collect the various changes from our <input> elements. And what better component to manage changes to a contact object than part one’s ContactForm:
var ContactForm = React.createClass({
  propTypes: {
    value: React.PropTypes.object.isRequired
  },

  render: function() {
    return (
      React.createElement('form', {className: 'ContactForm'},
        React.createElement('input', {
          type: 'text',
          placeholder: 'Name (required)',
          value: this.props.value.name,
        }),
        React.createElement('input', {
          type: 'email',
          placeholder: 'Email',
          value: this.props.value.email,
        }),
        React.createElement('textarea', {
          placeholder: 'Description',
          value: this.props.value.description,
        }),
        React.createElement('button', {type: 'submit'}, "Add Contact")
      )
    )
  },
});
Just as an <input> element displays its current value and emits changes via its onChange callback, we’d like our ContactForm to display a value (which it already does), and emit new contact objects via an onChange callback.
So, after modifying ContactForm.propTypes appropriately:
propTypes: {
    value: React.PropTypes.object.isRequired,
    onChange: React.PropTypes.func.isRequired,
}
And adding a console.log to our ContactView class to test our work:
React.createElement(ContactForm, {
    value: this.props.newContact,
    onChange: function(contact) { console.log(contact) },
})
Your task is to add a working onChange prop to the ContactForm class.
This will involve adding onChange callbacks to the <input> and <textarea> elements. These callbacks call ContactForm‘s own onChange callback, emitting a copy of the existing value with changes applied to the appropriate values. Your form element’s new value is available through the passed in SyntheticEvent target (see above example).
Once everything is working as expected, each keystroke in the contact form should emit a console message. You can see this in action with the below JSBin solution.
this is has a different meaning within a nested function!
Here is how you’d use Object.assign in this exercise:
// Return a new `contact` with an updated `name` property
var updated = Object.assign({}, this.props.value, {name: e.target.value})
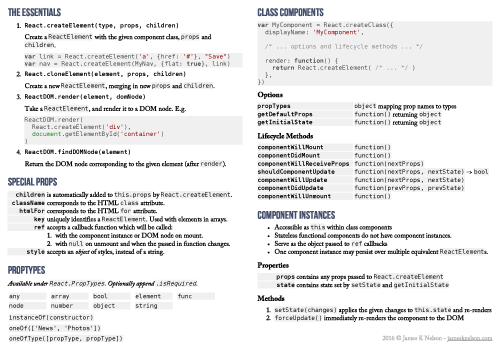
Congratulations – you’ve now completed the most important part of your form! Of course when you’re building forms on your own, you’re not going to get the correct propTypes handed to you on a platter; you’re either going to need to comb through the React documentation to find what works, or take a quick look at my React.js Cheatsheet. But I digress. Let’s move on and quickly implement the fun part of your form.
Get the PDF cheatsheet!
Exercise 2 – Displaying changes
Can you remember how we went about displaying new data in part one? All you need to do is create a new ReactElement with the updated data, and pass it to ReactDOM.render:
var rootElement = React.createElement(ContactView, newData)
ReactDOM.render(rootElement, document.getElementById('react-app'))
The only problem being that the new data is currently only available to the ContactView component:
var ContactView = React.createClass({
  // ...

  render: function() {
    return React.createElement('div', {className: 'ContactView'},
      // ...
      React.createElement(ContactForm, {
        value: this.props.newContact,
        onChange: function(contact) {
            /*
             * Our new `contact` is only available here
             */
        },
    })
  },
});

/*
  * But we want to use our new `contact` here!
  */
ReactDOM.render(
  React.createElement(ContactView, {
    contacts: contacts,
    newContact: newContact
  }),
  document.getElementById('react-app')
)
How would you access the new contact from the application’s entry point? Using callbacks, of course!
Your task is to add an onContactChange prop to the ContactView component, and use this to display the latest changes.
Once complete, you should have a working form:
And now you know everything you need to know to build Ridiculously Simple Forms with React! So let’s talk about:
Why?
The first time I saw a form component with value and onChange props, I thought to myself: this is fucking stupid! Why should my form have a value prop when the <input> elements underneath it have value props too? Isn’t that code duplication? Isn’t that failing to separate concerns? It felt anything but elegant, but here I am telling you to build forms that way — why?
React’s killer feature is that it helps us make user interfaces which are easy to reason about. But React can’t do this by itself; we need to help it out by making sure that a component’s props tell us everything about it. This means that our form’s displayed data must all be available under its value, and that changes must be emitted through callbacks — not hidden inside the form component’s state.
And the thing is — we wouldn’t be managing that state if we didn’t need to use it. Even if we were to find a way to move data from the <input> components to where it is needed without passing it through ContactForm‘s value and onChange props, there would still need to be some way of making that transfer happen.
In larger projects, all this wiring can make it a little harder to grok the bigger picture. In these cases, tools like Flux will help add structure to manage your complexity. But, if you’re just starting a new project, you don’t have any complexity to manage! So while our Ridiculously Simple Forms may not be particularly elegant, they are certainly incredibly simple:

value prop). Nobody uses them though, or at least nobody should.
So now that we’ve decided we’re going to structure forms this way, lets spend a little time making them easier to work with. Starting with:
Instance methods and auto-binding
Did your solution to Exercise One use anonymous functions for onChange callbacks, like mine?
var oldContact = this.props.value;
var onChange = this.props.onChange;

// ...

React.createElement('input', {
  type: 'text',
  placeholder: 'Name (required)',
  value: this.props.value.name,
  onChange: function(e) {
    onChange(Object.assign({}, oldContact, {name: e.target.value}));
  },
}),
Ignoring the fact that JavaScript creates these anonymous functions anew every single time render is called (which is sloooooow), defining handlers like this is a pain in the arse because we need a workaround to access this. And given the number of event handlers our forms need, this isn’t just a small pain.
To avoid this, define your handlers as component instance methods by passing them to React.createClass. React auto-binds instance methods, ensuring that this always refers to your component instance. Even when used as callbacks:
var ContactForm = React.createClass({
  propTypes: {
    // ...
  },

  onNameInput: function(e) {
    this.props.onChange(Object.assign({}, this.props.value, {name: e.target.value}))
  },

  render: function() {
    return React.createElement('form', {className: 'ContactForm'},
      React.createElement('input', {
        // ...
        onInput: this.onNameInput,
      })
      // ...
    )
  }
});
Structuring application state
As it stands, our app only contains two top level variables – contacts and newContact – so you’d think we’d be a way from having to worry about structure. But apps don’t stay small forever, and this begs the question of where do you draw the line? Five variables? 50?
For Ridiculously Simple Forms, and indeed Ridiculously Simple Apps, the best place to draw the line is actually one state variable. Managing all your state from one place means you’ll never forget to do your housekeeping, and also eliminates that most annoying problem of deciding where to put things.
But how do you turn two state variables into one? Exactly the same way that React does – with a state object and a setter function:
/*
 * State
 */

// The app's complete current state
var state = {};

// Make the given changes to the state and perform any required housekeeping
function setState(changes) {
  Object.assign(state, changes);

  ReactDOM.render(
    React.createElement(ContactView, Object.assign({}, state, {
      onNewContactChange: function(contact) {
        setState({newContact: contact});
      },
    })),
    document.getElementById('react-app')
  );
}

// Set initial data
setState({
  contacts: [
    {key: 1, name: "James K Nelson", email: "james@jamesknelson.com", description: "Front-end Unicorn"},
    {key: 2, name: "Jim", email: "jim@example.com"},
  ],
  newContact: {name: "", email: "", description: ""},
});
And since we’re deciding where to put things, let’s finish the job properly and also decide where to put code which modifies state. Since we’re aiming for simple, let’s just creates one function for each of the actions we can perform. Like this:
/*
 * Actions
 */

function updateNewContact(contact) {
  setState({ newContact: contact });
}
Switch out the anonymous function assigned to onNewContactChange for our new updateNewContact, and we’re good to go!
So now that you can add actions and state in your sleep, let’s try:
Exercise 3 – Saving contacts
The only thing left before your form is fully functional is the ability to add new contacts to the list.
To do this, you’ll need an action which expands the contacts array and resets newContact – let’s call this action submitNewContact. You’ll also want to make sure this action ignores contacts with an empty name or email. Once you’ve got your action though, you’ll need a way to call it.
We could do this by passing submitNewContact through to your submit button’s onClick prop, which is called every time the user clicks the button (surprise!). But, since we care about the user experience, we don’t want them to be surprised when they hit enter after entering their contact — and nothing happens. So instead, let’s call our action when the submit event is fired on the HTML <form>.
Your task is to implement the submitNewContact action.
Check the React documentation if you need help finding appropriate callback props. Once you’ve got it working, see how your solution compares with mine. Don’t get too hung up on any differences, though – the important thing is that it works!
e.preventDefault() on your submit event, otherwise your browser will do what it normally does and submit the form!
Don’t make users think
Congratulations – you’ve now completed a functional app! However, you’re not going to kill salesforce by just getting the functionality right. People won’t buy your product unless they understand it.
From your customer’s point of view, there is still a serious issue with this app: when the user clicks the “Add Contact” button without entering anything, nothing happens. People expect something to happen when they click a button, so let’s prevent any confusion by making sure something does.
Ridiculously Simple Validation
If you’ve completed exercise three (which you should have, seeing you’re reading this), you’ve already implemented basic validation! Our task is to actually display the result to the user.
Doing so will require passing our validation result from where it is computed to where it is rendered. Happily, we don’t need any callbacks this time; we can implement this by adding an errors object to the newContact object inside our submit action:
var contact = Object.assign({}, state.newContact, {key: state.contacts.length + 1, errors: {}});
Store any messages on the appropriate properties under contact.errors:
// Test that `contact.email` looks like a real e-mail address using a RegExp
if (!/.+@.+\..+/.test(contact.email)) {
  contact.errors.email = ["Please enter your new contact's email"]
}
And to distinguish between new contacts and those which have failed validation, let’s keep errors as null on our contact template:
var CONTACT_TEMPLATE = {name: "", email: "", description: "", errors: null}
If you’ve used Ruby on Rails, this pattern probably feels fairly familiar – the only difference is that it doesn’t use a special Errors class, making it even simpler. But now that we’ve stored our error messages in the application state, how do we display them?
Exercise 4 – Displaying validation errors
To keep things simple, let’s ignore the messages themselves.
Your task is to display a red border on the <input> elements which have an error.
Do so by adding className props to the appropriate <input> elements. Once you’ve got it working, compare your solution with mine.
And there you have it – you now know how to build Ridiculously Simple Forms! And all in less time than it would have taken to even start building a list of form libraries. Pat yourself on the back for a job well done!
Choose your adventure
So where do you go from here? Well, given that you now know how to make ridiculously simple forms, it wouldn’t hurt to invest some time in learning how to make them usable. To do this, you’re going to need to understand how to interact with the DOM using React. And this article will teach you how, using the same codebase that you’re already familiar with.
But once you’ve mastered React DOM interaction, are you just going to spend your weeks tweaking your single form on your single page? Of course you’re not. And that is why you need to learn about routing.
Luckily, after reading next week’s article in the Raw React series, you’ll be able to build an incredibly simple router for your React application in your sleep. And you won’t stop there – when complete, your app will be able to:
- Handle navigation/routing
- Communicate with an API
- Authenticate users
Update: Part 3: Routing with Raw React has been released.
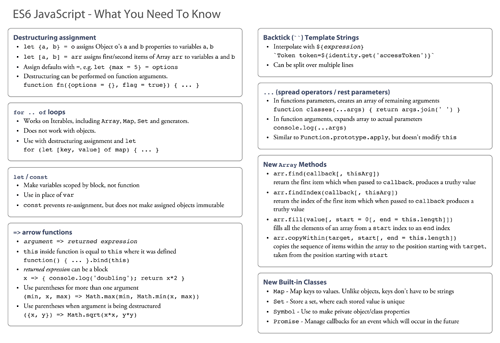
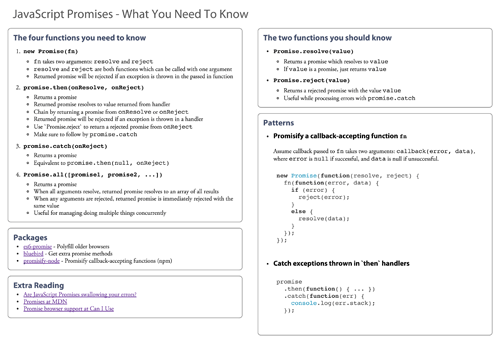
In return for your e-mail address, I’ll send you the complete series via e-mail as it is released. And as a bonus you’ll immediately receive 3 print-optimised PDF cheatsheets – on React, ES6 and JavaScript promises.
I will send you useful articles, cheatsheets and code.
One more thing – I love hearing from readers. If you have something to say, send @james_k_nelson a tweet, or send me an e-mail at james@jamesknelson.com. Thanks for reading!
Read More
- Interacting with the DOM in React
- Learn Raw React Part 1
- Learn Raw React Part 3: Routing
- Introduction to Higher Order Components
very useful article, thank you!
Nice article, James.
Question: Everytime when adding a contact you copy an array of contacts. Isn’t it too slow when there are many contacts?
state.contacts.slice(0).concat(contact)
Possibly, although you’d thousands of contacts before this became a problem. It isn’t something to worry about with an app this size, and ensuring we’re copying instead of mutating the array is important, as otherwise we’d be mutating our state.
On Exercise 2 we skipped right to state before explaining it ? I got a bit lost there.
Thank you, James!
This has been a nice introduction to ReactJS. I enjoy your writing, and your explanations are clearly communicated.
Very nice work. Your efforts are appreciated.
Looks great! will give it a try to see how its going
Best introduction to React I’ve seen yet.
This is great. Thank you. I signed up for the newsletter and followed you on Twitter.
I like your tutorials, very nicely done!
I do have a question, though. Why use this…
`state.contacts.slice(0).concat(contact)`
…and not just this:
`state.contacts.concat(contact)`
What advantage does slicing have in this scenario?
James, Great article! I am a designer and don’t develop daily. I am familiar with React and worked for a start-up that used React as framework. I gained more understanding of how React works by working through your exercises. Thanks for taking the time to put this together!
I am unable to see your jsBin codes. Anyone else also facing this issue?
I just checked and am able to view them. Is the problem resolved on your end?
I too am unable to view them. The JSBin sections show a loading bin, but it never loads for me.
My internet is fine as I can go to other websites.
You can add a “name” attribute for every input element, and then use a single onChange method that will use e.target.name as “key” for input value 🙂
I was surprised that the console output in exercise 1 was always a single character – I expected the input field(s) to store each character, and concatenate them to form the input string. Clearly, the data returned in the (synthetic) element callback is formed by concatenating the current value property, and the entered character, because the tutorial code certainly never does the concatenation, and the fields are correctly concatenated in ex. 2. I notice that in ex. 1, I can get more than one character to be logged by pasting in a string into the input field – a paste is obviously considered to be a single input event.
Please help me figure out why textfields hasn’t placeholders after sucessful form submit? I must click to field, so placeholders are going visible.