Disclaimer: I love JSX, Flux, ES6 and Webpack. I’ll discuss these tools more in another series.
Update August 2018: A newer, more complete introduction to React’s fundamentals is available at my course “React (without the buzzwords)”. It uses the latest version of React, and covers many topics that “Learn Raw React” is missing, including component state, asynchronous data storage, JSX, structure best practices, and more.
“React (without the buzzwords)” is composed of 30 lessons, with 55 live examples and exercises. It lets you save your progress through lessons, and automatically saves your exercise answers so you can pick up where you left off.
React (without the buzzwords) is exclusive to Frontend Armory Pro members. But you can try these 8 free lessons just by clicking one of the links – no signup required:
Of course, the original “Learn Raw React” guide is still useful today! Here it is:
So you’ve heard all the fuss about React.js – apparently it is the best thing since XMLHttpRequest. But you’ve spent a couple hours investigating, only to find so many buzzwords that it just feels overwhelming. JSX and flux and ES6 and webpack and react-router and all I want is somebody to just tell me how to use React already!
Luckily for you, that’s exactly what this series will do! Don’t believe me? That’s OK – you will after you’ve built your first React app in about 2 minutes time. Without downloading anything. Just by following this exercise:
Exercise 1 – Write a single-file React.js app
Have you worked with JavaScript, CSS and HTML before? Great! That means you can do this exercise!
The result of this exercise is a single HTML file, which contains your first React app. There are three steps, starting with:
Step 1
Copy this HTML into a new file and save it somewhere:
<!DOCTYPE html>
<html>
  <head>
    <meta charset="UTF-8" />
    <title>I'm in a React app!</title>
  </head>
  <body>
    <div id="react-app"></div>

    <script src="https://cdn.jsdelivr.net/react/0.14.0-rc1/react.js"></script>
    <script src="https://cdn.jsdelivr.net/react/0.14.0-rc1/react-dom.js"></script>
  </body>
</html>
This HTML file does two important things – it creates the div where your rendered content will live (with id react-app), and it loads the two library files where React lives.
With that done, let’s move on to:
Step 2
Type this script into a new <script> tag at the end of your HTML file.
var rootElement =
  React.createElement('div', {},
    React.createElement('h1', {}, "Contacts"),
    React.createElement('ul', {},
      React.createElement('li', {},
        React.createElement('h2', {}, "James Nelson"),
        React.createElement('a', {href: 'mailto:james@jamesknelson.com'}, 'james@jamesknelson.com')
      ),
      React.createElement('li', {},
        React.createElement('h2', {}, "Joe Citizen"),
        React.createElement('a', {href: 'mailto:joe@example.com'}, 'joe@example.com')
      )
    )
  )

ReactDOM.render(rootElement, document.getElementById('react-app'))
Phew, that was a bit of work, wasn’t it? But, hopefully all the repetition will have given you an idea of what that createElement method does. If not, maybe step three will help.
Step 3
Open your HTML file in a web browser, and check that the output looks like this:
Got it? In that case, congratulations! You’ve made your first React.js app, without even installing npm. And to celebrate, let’s have a look at how it works.
Introducing React
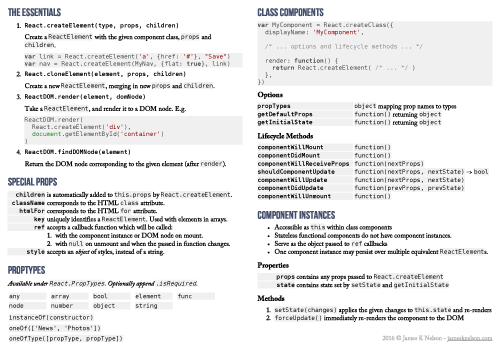
At it’s most basic, React is a tool for rendering HTML with JavaScript. ReactDOM.render takes a ReactElement object describing what to render, adding the result to the given DOM node. But how do you create ReactElement objects? That’s where React.createElement comes in.
React.createElement takes three parameters, and returns a ReactElement. From the React documentation:
createElement(string/ReactClass type, [object props], [children ...]) -> ReactElement
The type argument lets us specify what type of HTML element to use; it also lets us specify custom elements (which we’ll learn about later). The props argument is a way of specifying which attributes are defined on the HTML element, as you may have guessed from the mailto link in the exercise. Finally, the children arguments are strings or ReactElement objects (or arrays of the same) which will be used for the returned element’s content. By choosing to omit or specify children, you can return a single ReactElement or an entire tree.
Since createElement is just plain JavaScript, you can mix in loops, if statements, and anything else JavaScript allows. You can also easily substitute in data stored in JSON. For example, if you had a list of contacts but didn’t want to render the ones without e-mail addresses, you could do something like this:
var contacts = [
  {key: 1, name: "James Nelson", email: "james@jamesknelson.com"},
  {key: 2, name: "Bob"}
]

var listElements = contacts
  .filter(function(contact) { return contact.email; })
  .map(function(contact) {
    return React.createElement('li', {key: contact.key},
      React.createElement('h2', {}, contact.name),
      React.createElement('a', {href: 'mailto:'+contact.email}, contact.email)
    )
  })

var rootElement =
  React.createElement('div', {},
    React.createElement('h1', {}, "Contacts"),

    // If your `children` is an array, you'll need to give each one a unique `key`
    // prop. I'll explain why a little later.
    React.createElement('ul', {}, listElements)
  )

ReactDOM.render(rootElement, document.getElementById('react-app'))
Neat. So React can be used as a very verbose JavaScript-based templating system! But… surely that wouldn’t explain the cult-like following it has received. What gives?
Components
Did you notice the little ReactClass in the type signature of React.createElement? I skipped over it because we hadn’t used it yet, but can you guess what it does?
The answer is … drum roll please: React.createElement isn’t limited to standard HTML. It also lets you create your very own components!
How? With React.createClass:
var ContactItem = React.createClass({
  propTypes: {
    name: React.PropTypes.string.isRequired,
  },

  render: function() {
    return (
      React.createElement('li', {className: 'Contact'},
        React.createElement('h2', {className: 'Contact-name'}, this.props.name)
      )
    )
  },
});
This little snippet defines a new component called ContactItem. Like HTML elements, a ContactItem accepts a list of attributes (called props). Unlike HTML elements, you can define whatever props you need!
You’d use the above component like so:
var element = React.createElement(ContactItem, {name: "James K Nelson"})
And just as you may expect, element would now contain the value returned by your component’s render function.
children argument to createElement, it’s value will be available under this.props.children
Let’s test your understanding with another exercise:
Exercise 2 – Refactor your contact list
Refactor your solution to the first exercise using what you’ve learned. In particular:
- Create a
ContactItemclass which accepts three properties:name,emailanddescription - Filter out contacts with no e-mail address
- Store your data in an array instead of passing it directly to
createElement
Use the following data:
var contacts = [
    {key: 1, name: "James K Nelson", email: "james@jamesknelson.com", description: "Front-end Unicorn"},
    {key: 2, name: "Jim", email: "jim@example.com"},
    {key: 3, name: "Joe"},
]
When you’re done, check your work against this fiddle:
propTypes
You may have noticed that my solution to Exercise Two uses two different values for the propTypes object – one with isRequired, and one without. This suffix can be applied to any of React’s available prop types to indicate that the specific prop must be passed to React.createElement.
But wait a minute, you say. What does the propTypes object actually do?
The secret is that in most cases, propTypes doesn’t actually do anything. In fact, we could completely remove it, and our app would still function identically. So why is it there?
propTypes is a debugging mechanism; it lets React check in real time that the props argument passed tocreateElement actually makes sense. If it doesn’t, React will log a warning to the console:

I’ve included propTypes in this guide because it’ll save you a lot of pain in the long run – even if it isn’t strictly necessary. And you can make it even less painful by printing out the cheatsheet PDF you’ll get when you sign up for my newsletter – but I digress! Now that we know how to display some data, let’s learn how to update it.
Get the PDF cheatsheet!
Displaying new data
So far, our app has only had to take a static set of data, and render it to the DOM once. But what happens when our data changes?
Despite what you may expect from a tool called React, nothing changes. Unlike the automatically-updating views in so many other JavaScript frameworks, React waits for us to manually order a re-render. So how do we do it?
// Render our app to the DOM element with id `react-app`
var rootElement = React.createElement(ApplicationComponent, initialData)
ReactDOM.render(rootElement, document.getElementById('react-app'))

// Actually, there is no re-render. Just render.
var nextRootElement = React.createElement(ApplicationComponent, updatedData)
ReactDOM.render(nextRootElement, document.getElementById('react-app'))
But where our first render call creates an entire new tree of HTML elements under #react-app, our second call only changes the parts which have actually changed. This is where React gets it’s reputation for performance. In fact, if we were to do this:
var rootElement = React.createElement(ApplicationComponent, data)
ReactDOM.render(rootElement, document.getElementById('react-app'))
ReactDOM.render(rootElement, document.getElementById('react-app'))
The second call to render would do absolutely nothing. Nothing – that is – unless you are rendering an array of elements without assigning a unique key prop to each. To understand why this is, you’ll need to know a little about how render works under the hood.
How ReactDOM.render works
The first call to ReactDOM.render is simple – it walks through the passed in ReactElement and creates a corresponding HTML tree under #react-app. But as I mentioned above, the second and subsequent calls don’t modify previously rendered HTML elements unless the corresponding ReactElement objects have changed. Why?
In order to decide what to change, React compares the new ReactElement tree with the previous one. It uses a number of rules to decide what to do:
-
ReactElements with differing types are trashed and re-rendered -
ReactElements with differing props or children are re-rendered in place - Identical
ReactElements which have been re-ordered within an array are moved to reflect the new order
There’s one catch – when React encounters an array of ReactElements with identical type and props, despite looking identical from the outside it cannot know that they are really identical. This is because elements can have internal state – for example, whether the element currently has user focus. This becomes a problem when React goes to re-render those elements, as it cannot tell one from another – and thus doesn’t know if their order within the array has changed.
This is where the key property from the earlier examples comes in. It lets React distinguish between elements, and keep the DOM aligned with our ReactElement tree.
But enough theory, let’s talk about something practical.
Forms
You now know enough to add a form to your app! That is, as long as you don’t mind that users won’t be able to interact with it yet. But why this limitation?
In React, input elements aren’t actually all that special. They take a value prop, and they’ll display what that value is. And since a component can’t directly change the props which are passed in from the outside world – user input won’t cause any change in the displayed value.
Take a moment to let that sink in. If you type into a form input with a value attribute, nothing changes. This isn’t to say the value can’t change – if you listen to the input events and update the value accordingly, you can change it however you’d like. More about this later, though.
In addition to value, input elements take the props you’d expect them to. With a few minor exceptions, the attributes you can pass to a HTML <input> are also available as props. There are two exceptions worth keeping in mind:
- React
textareaelements take their content as avalueprop, not aschildren - The HTML
forattribute is bound to thehtmlForprop (asforis a reserved word in JavaScript)
These exceptions are listed on the React cheatsheet you’ll receive after signing up for my newsletter.
Exercise 3: Add a read-only form
Let’s create a new ContactForm component class, with the following propTypes:
propTypes: {
  contact: React.PropTypes.object.isRequired
},
It should render a <form> element containing <input> elements for name and email, a <textarea> for description, and a <button type="submit">. For simplicity, use placeholders instead of labels. And remember – the React textarea component accepts it’s value under props, not children.
Once you’ve built your ContactForm class, add it beneath your contact list with a blank contact passed in for the contact prop. I’ll wait here until you’re done.
Done? Great! Now check how your implementation compares to mine – take note of any differences, but don’t get too hung up on matching my implementation line-for-line. The important thing is that you write something which works.
Making your app beautiful
You haven’t even finished this article, and you’re already on your way to killing salesforce. But nobody is going to buy your product if it looks shit. So let’s add some style.
How should we go about this? Well, since this app is tiny, we could just style it using HTML selectors:
ul {
  background: #ff0000;
}
But this will stop working if our app ever gains another list – so let’s avoid headaches later and assign classes to our elements. To avoid conflicts, we’ll namespace them with their parent component’s class name.
For our ContactItem component, this will look something like this:
render: function() {
  return (
    React.createElement('li', {className: 'ContactItem'},
      React.createElement('h2', {className: 'ContactItem-name'}, this.props.name),
      React.createElement('a', {className: 'ContactItem-email', href: 'mailto:'+this.props.email}, this.props.email),
      React.createElement('div', {className: 'ContactItem-description'}, this.props.description)
    )
  )
},
className property to assign CSS classes (as class is a reserved word in JavaScript).
But how do we pick class names for our createElement calls which aren’t part of a component render function?
You’ll generally find that React projects organise everything into classes, with a single React.createElement call rendering a top-level element which is directly passed to ReactDOM.render. For this app, let’s use a top-level ContactView with this signature:
propTypes: {
  contacts: React.PropTypes.array.isRequired,
  newContact: React.PropTypes.object.isRequired,
},
Exercise 4 (optional):
If you’d like to style your new app, create the ContactView class as defined above, add className props where relevant, and add a stylesheet to your HTML file.
Need ideas? Here is a fiddle I prepared earlier:
Nobody likes a read-only app
You now know enough to make pretty apps, but how do you learn to make interactive ones?
This article is only the first in a series on Raw React. I aim to release a new article every week, and won’t be stopping until you can use them to make a real app with React. That means an app which:
- Handles form events
- Handles navigation/routing
- Communicates with your API
- Manages user authentication
Update: Part 2: Ridiculously Simple Forms has been released.
In return for your e-mail address, I’ll send you the complete series via e-mail as it is released. And as a bonus you’ll immediately receive 3 print-optimised PDF cheatsheets – on React, ES6 and JavaScript promises.
I will send you useful articles, cheatsheets and code.
I love hearing from readers. Send @james_k_nelson a tweet, or send me an e-mail at james@jamesknelson.com. Thanks for reading!
Read more
- Learn Raw React Part 2: Ridiculously Simple Forms
- Learn Raw React Part 3: Routing
- Interacting with the DOM in React
James, thank you for putting this terrific series! We’ve been building React applications with no frills (ES6, JSX…) for some time now. It’s been working really well for us. Yours is the first article I’ve read that really cuts away everything but React.
Thanks again!
Finally!
Someone wrote a guide to using React without the rest of the toys in the ecosystem.
Keep ’em coming 🙂
Good article. I follow your exercises, I found I can’t input words in contact form. I tried the form of your jsfiddle. I entered words in input filed, no value showed. Can you explain this? thx
I get the answer in next part. Well done!
This is not showing me anything new. I can do the equivalent with native js – document.createfragment, which i have no need to do because it would make more sense to cache the elements that i need in the dom on first load anyway. Why reinvent wha already serves no good purpose?
You’re right – this *can* all be done with plain ol’ vanilla JS. Where React really starts to excel is when your app is split into components, which can be swapped out as required, re-used across projects, etc.
This is just the first article in the series – and it is mostly aimed at people who’ve already done some research and have decided they want to learn to React. That said, I hope that if you continue to read part 2 (and subsequent parts when released), the elegance of React will become a little clearer.
Thank you very much for writing this article. I was looking for similar tutorial where i can quickly learn about React..
Amazing article thank you!
There’s a typo in the code snippet you use to introduce React.createClass (var ContactItem…). There should be no comma after ‘…this.propsname)’ – I get a syntax error in Chrome if there is.
Thanks, fixed it.
This is SOOOO helpful! Thanks!
If I undestand correctly you use react
and then add to it JSX, next Flux, no ES6, next Webpack.
JSX – observables? flux? es6 (typescript as well?), webpack – is webpack the best?
James… A brilliant article. I have long been a fan of Raw (sans JSX) React. I find it to be both more expressive and less disruptive with tooling. However, you could make your example code much more readable by starting it with “var h = React.createElement”, thus giving you a poor man’s HyperScript.
Or, if you prefer really pretty “mark-up”, consider starting your code with “var div = React.DOM.div” (repeat for each required tag), which would then allow a much simplified “div({className: ‘foo’}, ‘Foo!’)” in the render code. Note that using ES6 destructuring “const {div, h1, p} = React.DOM” at the top of the module makes this even more attractive.
I think you need to consider the audience for this post. It’s for people learning to write the basics of React, not to learn to write React better. As someone who’s new to React I prefer that he sticks to the basics as to not complicate it more than it needs to be.
That said, your comment is great and once I get the hang of React I will try applying it to keep things clean.
Great article, thank you for the information.
I found that learning React without any of the extra tools (JSX, ES6, Webpack) to be most optimal when starting.
Also a tip, if you don’t want to keep writing React.createElement(), you could simply create a shorter variable for the function call.
var el = React.createElement;
Below is an example:
“use strict”;
var el = React.createElement;
var ui =
el(‘div’, {},
el(‘h1’, {}, “Contacts”),
el(‘ul’, {},
el(‘li’, {},
el(‘h2’, {}, “James Nelson”),
el(‘a’, {href: ‘mailto:james@jamesknelson.com’}, ‘james@jamesknelson.com’)
),
el(‘li’, {},
el(‘h2’, {}, “Joe Citizen”),
el(‘a’, {href: ‘mailto:joe@example.com’}, ‘joe@example.com’)
)
)
)
ReactDOM.render(ui, document.getElementById(‘react-app’))
Love it. Thanks for making it less painful than it has to be. Another similar language to React worth looking at is Marko Widgets (runs on Marko, made by eBay) with Node.js.
If JSX makes JavaScript more like HTML, Marko makes HTML more like JavaScript, and it’s waay easier to comprehend—even though they are quite similar. Cheers.
Thank you, thank you, thank you!!!!
My savior 😉
Someone who wants to help people create amazing things. You’re a true hero. Thanks a lot for this tutorial. 🙂
Hi James,
Followed this tutorial and found it to be amazing in starting to learn React. It really is the missing piece.
I followed all the exercises and everything worked when I did it myself (no copy & paste I promise). I do however have aa question: Why is the blank contact object required on the ContactForm instance? My own code works just like yours without it, so maybe I’m missing the point?
I really appreciate your help 🙂
“React waits for us to manually order a re-render. ”
// Render our app to the DOM element with id `react-app`
var rootElement = React.createElement(ApplicationComponent, initialData)
ReactDOM.render(rootElement, document.getElementById(‘react-app’))
// Actually, there is no re-render. Just render.
var nextRootElement = React.createElement(ApplicationComponent, updatedData)
ReactDOM.render(nextRootElement, document.getElementById(‘react-app’))
My question is about the above. In other places I have seen ReactDOM.render() just called once and the rest is automatically handled. Do we have to manually call this function?
Updating a component’s state (using the setState method) also triggers a re-render. This discussion is interesting: https://stackoverflow.com/questions/30626030/can-you-force-a-react-component-to-rerender-without-calling-setstate
Love this tutorial but… should likely be updated to note that the sample code uses an old version of React from the CDN. It still works but I was initially thrown off when I saw things in my generated output (like data-reactid attributes) that were removed a few months ago. Best place to get latest CDNs seems to be https://facebook.github.io/react/downloads.html
Dude,
I wish I had seen your blog much earlier.
Thanks a TON buddy,
A bit off topic, but just out of curiosity, I tried to use the React Development Tools (Chrome extension) with the tutorial page, but the “React” tab doesn’t show up. If I switch to the Facebook site, it does appear. Any ideas why this is? I have tried updating the tutorial to load the latest React code, but that doesn’t work either.
Ah – I had to enable local file access for the extension – working now. 🙂
I am following your blogs and trying to create a component but stuck with a small problem I am unable to render the ajax response. Can you please guide me what I am doing wrong in that. Here is the code https://stackoverflow.com/questions/39720791/fetched-data-from-ajax-in-component-is-not-rendering-in-react/39721002?noredirect=1#comment66740295_39721002. I am not getting any error in console.
Thanks a lot for this great article! Super easy to follow to get a basic idea how it works!
Thank you for actually writing a great tutorial and having the pride to check it before it works. People like you are becoming rarer and rarer. Thanks