TL;DR? Clone the Starter Kit instead.
Have you ever wished that libraries for React apps could be simpler?
Sure, you know that there are cases when all the bells and whistles are an advantage — but for you, features aren’t as important as clarity. Instead of giving up control to fast-moving libraries written by big names, you want to understand what is going on under the hood. And instead of sifting through documentation on twenty different tools before getting started, you want to get stuck into it right now.
And you’re not alone! In fact, most of my work has involved small projects which don’t make use of many of the features provided by popular routing libraries. So instead, I’ve rolled my own routing using Redux and React. And it is so simple that everything you need to know fits into this short guide.
Overview
This guides assumes you have experience with both React and Redux. If you’re still new to React, try my Raw React series instead.
The key to routing with Redux and React is understanding that your current route is Just Application State. And like any other application state, it lives in your Redux store. With this in mind, the rest is just implementation details.
Of course, the details are still important. In particular, the question of which browser API you use to handle navigation will greatly affect your implementation. But since we’re aiming for simplicity, I’ll assume you’re using hash-based routing for the reasons listed here.
Contents
- Handling browser events
- Parsing URIs
- Storing navigation state
- Connecting your Store to your View
- Choosing views: the
Applicationcomponent - Navigating with Links
- Navigating programatically
- Redirections
- What should I do next?
Handling browser events
Routing begins with event handling – specifically, with handling events produced by changes in the browser’s current URL.
For hash-based routing, the event you’re interested in is hashchange. The browser emits this event whenever the part of the URL after the # character is updated without the rest of the URL changing. As an example, this happens when the user clicks an <a> tag with a href beginning with #, or when a script updates window.location appropriately.
Handling changes to the browser hash is simple: listen for the hashchange event, and then process the new value of window.location.hash when it occurs:
function onHashChange() {
    // Do something appropriate with `window.location.hash`
    console.log(window.location.hash);
}

// Handle browser navigation events
window.addEventListener('hashchange', onHashChange, false);
pushState based router instead of a hash-based router, use rackt/history‘s history.listen method instead.
Parsing URIs
Once you have the new URI, you need to match it to a specific view.
In a really simple app, this could be as simple as removing the leading # and trailing / characters. However, larger apps generally avoid directly coupling views with their URIs. Instead, they define a number of named routes which are matched to URI templates. The template format can vary between parsing tools, but sections are generally delineated with /, and named route parameters are generally denoted by the : character.
Here’s an example of how to define named routes with Unicorn Standard’s uniloc tool:
var ROUTES = uniloc({
  root: 'GET /',
  documentList: 'GET /:userID/:documentID',
  documentEdit: 'GET /:userID/:documentID/edit',
})
You can then look up a given URL’s route name and parameters with ROUTES.lookup; this returns an object containing the route name under name, and route parameters under options:
ROUTES.lookup('/unicorn/pacomo/edit')
// -> { name: 'documentEdit', options: { userID: 'unicorn', documentID: 'pacomo' } }
You can also generate URLs using ROUTES.generate, which accepts a route name, and optionally an object containing route parameters:
ROUTES.generate('documentEdit', { userID: 'unicorn', documentID: 'pacomo' })
// -> "/unicorn/pacomo/edit"
Now that we have an object representing the user’s location, we need to put it in our Redux store.
Storing navigation state
As a Redux-based app only has one store, we’ll need to decide where to place our navigation data within that store.
Personally, I like to set my app up with a navigation reducer which manages any navigation-related state. For the moment, this will only contain the above location object, but we’ll add to it a little later.
In addition to our navigation reducer, we’ll also need to dispatch an action each time the browser emits a navigation event. Here is my implementation of the two:
// The action to be called when the browser navigates
function navigationComplete() {
  return {
    type: 'NAVIGATION/COMPLETE',
    location: ROUTES.lookup(window.location.hash.substr(1)),
  }
}

// The reducer to manage navigation-related state
function navigationReducer(state = {
  location: null,
}, action) {
  switch (action.type) {
    case 'NAVIGATION/COMPLETE':
      return {
        location: action.location,
      }

    default:
      return state
  }
}
And with that, your store now contains your current location! All that remains is to use this information to choose which view to display.
Connecting your Store to your View
If you’ve built a React application with Redux before, you’ve probably used react-redux to connect your components with data from your store. And while it is still possible to use react-redux with Simple Routing, I prefer to use actors — a pattern which lets us respond to route changes before rendering the view.
We’ll get to how actors work in a moment, but in the meantime let’s do a little quiz: Can you write the code which re-renders your view?
Assume that your view resides in an <Application /> component, which accepts a state object and the dispatch function associated with your Redux store. Check your answer by touching or hovering your mouse over this box:
var APP_NODE = document.getElementById('react-app');
store.subscribe(function() {
  // Don't re-render if we're in the process of navigating to a new page
  ReactDOM.render(
    <Application state={store.getState()} dispatch={store.dispatch} />,
    APP_NODE
  );
})
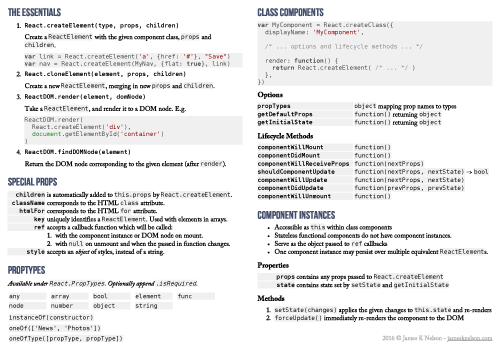
Shameless plug: If you find React’s API a little difficult to remember, why not print out my PDF React cheatsheet? It fits most of React’s API onto a single page (see preview), and you’ll get it for free immediately after join to my newsletter!
Get the PDF React Cheatsheet
The solution to the quiz above has one problem: it will render every single state which your application passes through. Sometimes you’d like to skip a state — for example, the intermediate location in a redirect sequence — and actors make this easy.
Transitioning between application states using actors
Actors are a sequence of functions which are called each time your store’s state changes, with one important exception: they aren’t called in response to actions dispatched from other actors.
Each actor receives your store’s dispatch function and current state. The upshot of this is that if an actor dispatches an action, the next actor’s state will reflect the result of that action.
If this sounds at all complicated, it won’t after you see the implementation:
// An array of actor functions taking a `state` object and `dispatch` function
var actors = [ ... ]

var acting = false
store.subscribe(function() {
  // Ensure that any action dispatched by actors do not result in a new
  // actor run, allowing actors to dispatch with impunity.
  if (!acting) {
    acting = true
    actors.forEach(function() {
      actor(store.getState(), store.dispatch)
    })
    acting = false
  }
})
Implementing our renderer as the final actor in the actors array ensures that it renders the result of any actions dispatched by previous actors:
var APP_NODE = document.getElementById('react-app')
function renderer(state, dispatch) {
  ReactDOM.render(
    <Application state={state} dispatch={dispatch} />,
    APP_NODE
  )
}
If you’d like more examples of actors, see my introduction to actors. Otherwise, let’s take a look at that mysterious Application component.
Choosing views: the Application component
The Application component is the interface between your Redux-based model, and your React-based view. It is responsible for choosing a Container component to render, and then passing it the current state object and dispatch function. This may sound complicated, but its implementation is typically a simple switch statement; using stateless function components, it would look something like this:
function Application(props) {
  const location = props.state.navigation.location

  switch (location.name) {
    case 'documentEdit':
      return <DocumentContainer {...props} id={location.options.id} />
    case 'documentList':
      return <DocumentListContainer {...props} id={location.options.id} />

    default:
      return <div>Not Found</div>
  }
}
Application.propTypes = {
  state: React.PropTypes.object.isRequired,
  dispatch: React.PropTypes.func.isRequired,
}
The containers here are different to the containers you’ll find in a lot of other Flux apps; instead of being directly subscribed to your Redux store, they’re just normal components with a name which contains the word Container.
That said, the Container suffix does have an implied meaning — it indicates that they take state and dispatch properties, and don’t do anything except pass the correct state and action creators through to “dumb” child components. To understand why this distinction exists, read Redux creator Dan Abramov’s excellent explanation.
Some people don’t like long switch statements. And after using Coffeescript for a number of years, I can see why — JavaScript’s syntax really leaves a lot to be desired. But if you imagine the curly braces and repetitive return statements disappearing for a moment, the long switch statement is really a quite simple — and in my opinion elegant — way of selecting views.
Navigating with Links
Links for your app can be as simple as <a> tags with a href starting with #. For example:
<a href="#/unicorn/pacomo/edit">Edit contact</a>
While this will get the job done, you may prefer to create a <Link> component which allows you to specify named routes – reducing the coupling between URLs and routes. If you’re using stateless function components and the ES7 Object rest properties proposal, your module will look something like this:
import React from 'react'
import ROUTES from '../routes'

const Link = ({name, options, children, ...props}) =>
  <a {...props} href={'#'+ROUTES.generate(name, options)}>{children}</a>

Link.propTypes = {
  name: React.PropTypes.object.isRequired,
  options: React.PropTypes.object.isRequired,
  children: React.PropTypes.node.isRequired,
}

export default Link
Your <Link> component can then be used as so:
<Link name='documentEdit' options={{userID: 'unicorn'}}>Edit Contact</Link>
Navigating programatically
The fundamentals of programatic navigation are simple; just use window.location.replace. For example:
window.location.replace(
  window.location.pathname + window.location.search + '#/unicorn/pacomo/edit'
);
But while this works, you’ll come across a major problem when using it in conjunction with other actions: the hashchange event which it produces won’t be called until the next tick.
To understand why this presents a problem, consider the case of a save action which clear a form’s contents and then navigates the user to another route. If our action creator does both of these at once, the flow of events will look something like this:
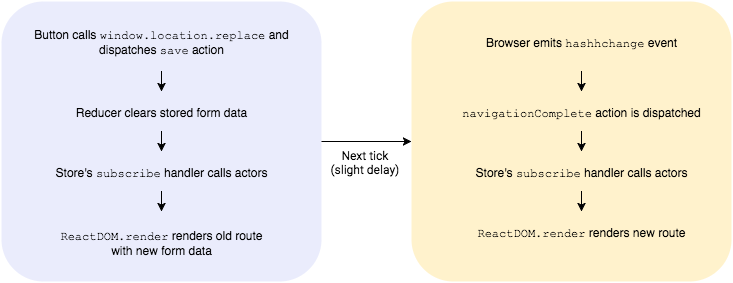
This results in a brief flash with outdated data. Instead, we’d like our flow to not render our view at the end of the first tick.
The solution contains three steps:
- Add a
transitioningboolean to yournavigationreducer - Update your
rendereractor to skip rendering whentransitioningis true - Add a
navigationStartaction to start the process
Here is my implementation:
// This action lets you navigate to the routes you defined earlier
function navigationStart(name, options) {
  // Use the redux-thunk plugin to allow us to skip dispatching an action
  // if we're already at the correct URI
  return function(dispatch) {
    var currentURI = window.location.hash.substr(1)
    var newURI = ROUTES.generate(name, options)

    if (currentURI != newURI) {
      dispatch({ type: 'NAVIGATION/START' });

      window.location.replace(
        window.location.pathname + window.location.search + '#' + newURI
      )
    }
  }
}

// The updated navigation reducer
export default function navigationReducer(state = {
  transitioning: false,
  location: null,
}, action) {
  switch (action.type) {
    case 'NAVIGATION/COMPLETE':
      return {
        transitioning: false,
        location: action.location,
      }

    case 'NAVIGATION/START':
      return {
        transitioning: true,
      }

    default:
      return state
  }
}

// The updated renderer actor
var APP_NODE = document.getElementById('react-app')
export default function renderer(state, dispatch) {
  if (!state.navigation.transitioning) {
    ReactDOM.render(
      <Application state={state} dispatch={dispatch} />,
      APP_NODE
    )
  }
}
And now dispatching a navigationStart action before any other changes will cause navigation.transitioning to become true, preventing your app from re-rendering until the browser emits the hashchange event in the next tick.
Redirections
The primary use for redirection is ushering the user to the correct location after they arrive at the root URL. The actual behaviour required varies wildly between applications, so let’s just do something stupidly simple: checking the current location with an if statement on each change, and dispatching a navigationStart action if we want to initiate a redirect.
As mentioned earlier, this is a perfect use case for an actor function. For example:
function redirector(state, dispatch) {
  const {name, options} = state.navigation.location || {}
  const currentURI = window.location.hash.substr(1)
  const canonicalURI = name && ROUTES.generate(name, options)

  if (canonicalURI && canonicalURI !== currentURI) {
    // If the URL entered includes extra `/` characters, or otherwise
    // differs from the canonical URL, navigate the user to the
    // canonical URL (which will result in `complete` being called again)
    dispatch(navigationStart(name, options))
  }
  else if (name == 'root') {
    // If we've hit the root location, redirect the user to the main page
    dispatch(navigationStart('documentList'))
  }
}
You’ll have noticed that I’m doing more here than just redirecting the user away from the root route – what is this business about canonicalURI?
One of the features of Uniloc is that it can generate a URI for any route it recognises. And seeing that Uniloc knows how to strip / characters from the URIs you feed it, the generated URI may be different from the URI the user navigates to. While this isn’t a huge problem, it doesn’t hurt to ensure a one to one mapping between routes and URIs exists.
And with that, you now know everything there is to know about Simple Routing! Congratulations!
So what should I do next?
Assuming you’re reading this is because you want to understand what is going on underneath the hood, the next thing to do is practice. Start a new project, type everything out by hand (no copying and pasting), and keep at it until you’ve got yourself a working app with a working router. Once you’ve built it, you’ll have no trouble doing it again.
Of course, sometimes you don’t have the luxury of practicing, and you just need something which works right now. In this case, your next step is to clone the Unicorn Standard Starter Kit – it is based on this article, and implements each of the concepts you’ve learned about.
But the process of building an application doesn’t end once you have a router. You’ll then need to create UI components, fetch data from your backend, style your application and add authentication — amongst other things. I’ll be writing guides to each of these in the future, and the only way to ensure you don’t miss them is to join my Newsletter!
And to sweeten the deal, in return for your e-mail address you’ll immediately receive three print-optimised PDF cheatsheets – for React (see preview), ES6 and JavaScript promises – completely free!
I will send you useful articles, cheatsheets and code.
One more thing – I love hearing your opinions, questions, and offers of money. If you have something to say, leave a comment or send me an e-mail at james@jamesknelson.com. I’m looking forward to hearing from you!
Read More
- Push-state vs hash-based routing
- Introduction to Actors
- Learn Raw React
- Smart and Dumb Components by Dan Abramov
- HTML5 History at MDN
Related Projects
- Unicorn Standard Starter Kit – a boilerplate based on Simple Routing
- Uniloc
- rackt/history
- rackt/react-router